
I want to know how to purchase and use COLDCARD.
Among hardware wallets for managing Bitcoin independently, "COLDCARD" is highly regarded by security-conscious Bitcoiners.
Though less known than Ledger Nano or Trezor, many choose COLDCARD as a second wallet for its robustness and decentralization features.
This article explains how to buy, use, and receive/send Bitcoin with COLDCARD.

Summary of the Article
- COLDCARD is a hardware wallet specialized for Bitcoin.
- It includes many advanced security features and can operate without connecting to a computer.
- Carefully manage the device, seed phrase, passphrase, and PIN code to ensure they are not known or stolen by others.
This article was written in Japanese and converted to English using a translation tool.
Date of writing (Japanese version): June 2024
目次[表示]
What is COLDCARD?
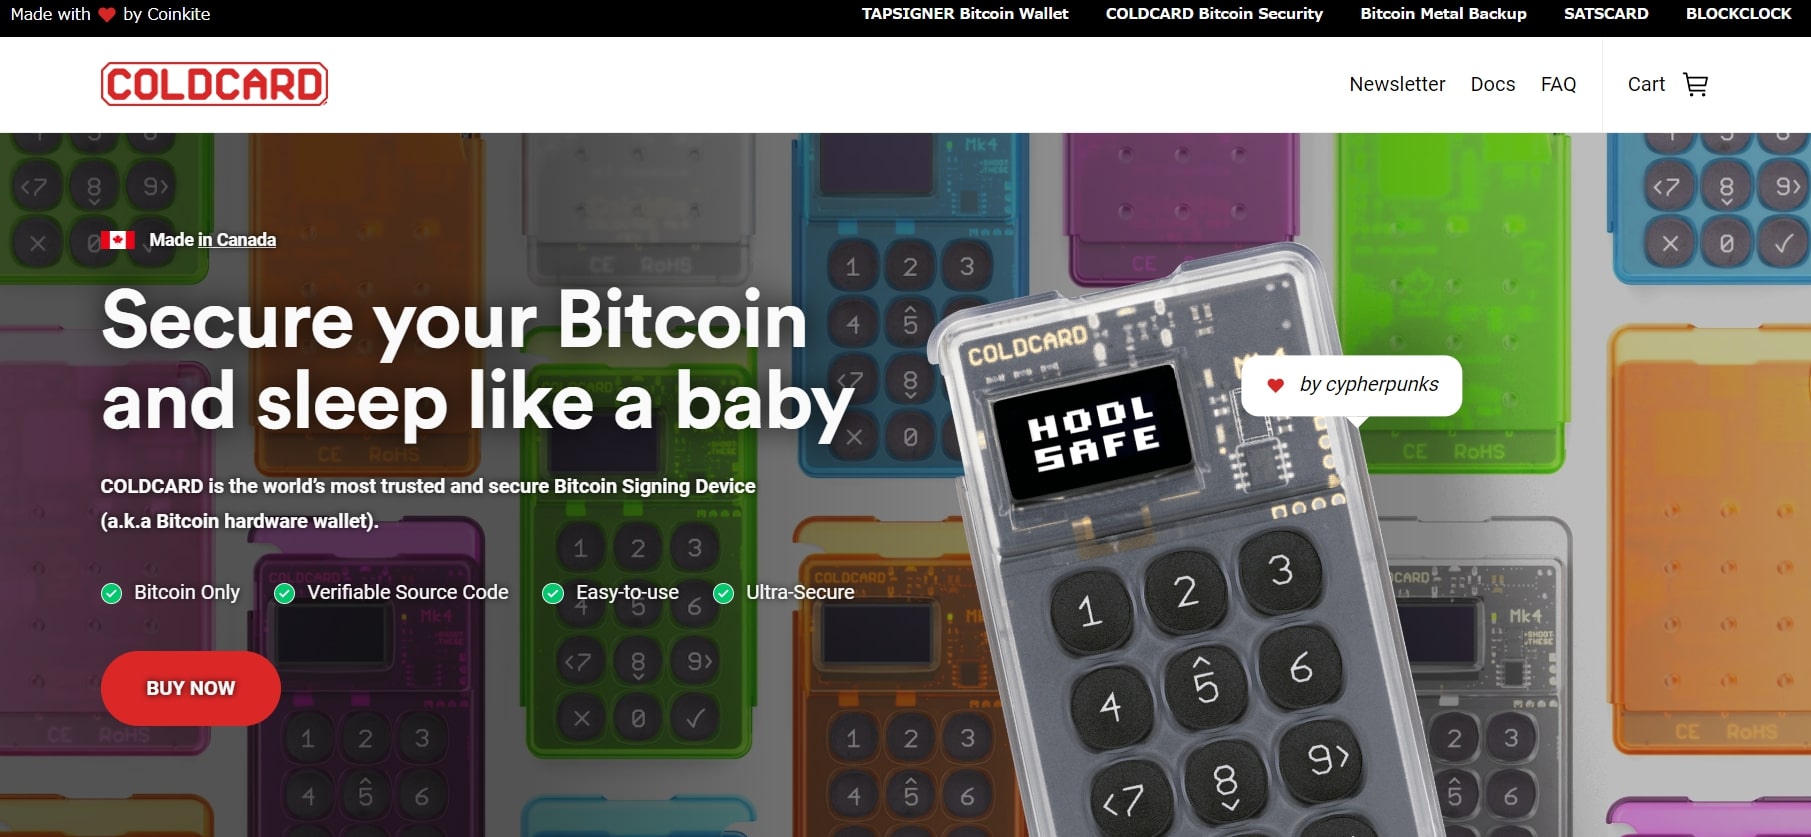
COLDCARD is a hardware wallet specialized for managing Bitcoin. It is operated by a Canadian company called Coinkite and has been available since 2018.
It includes various security measures and can be used in an air-gapped manner, meaning it does not require an internet connection.
It features open-source firmware and includes two secure elements to protect confidential information, emphasizing security in all aspects.


It doesn’t support altcoins and focuses solely on Bitcoin, which might be appealing to Bitcoiners for its simplicity!
Differences Between COLDCARD Mk4 and COLDCARD Q
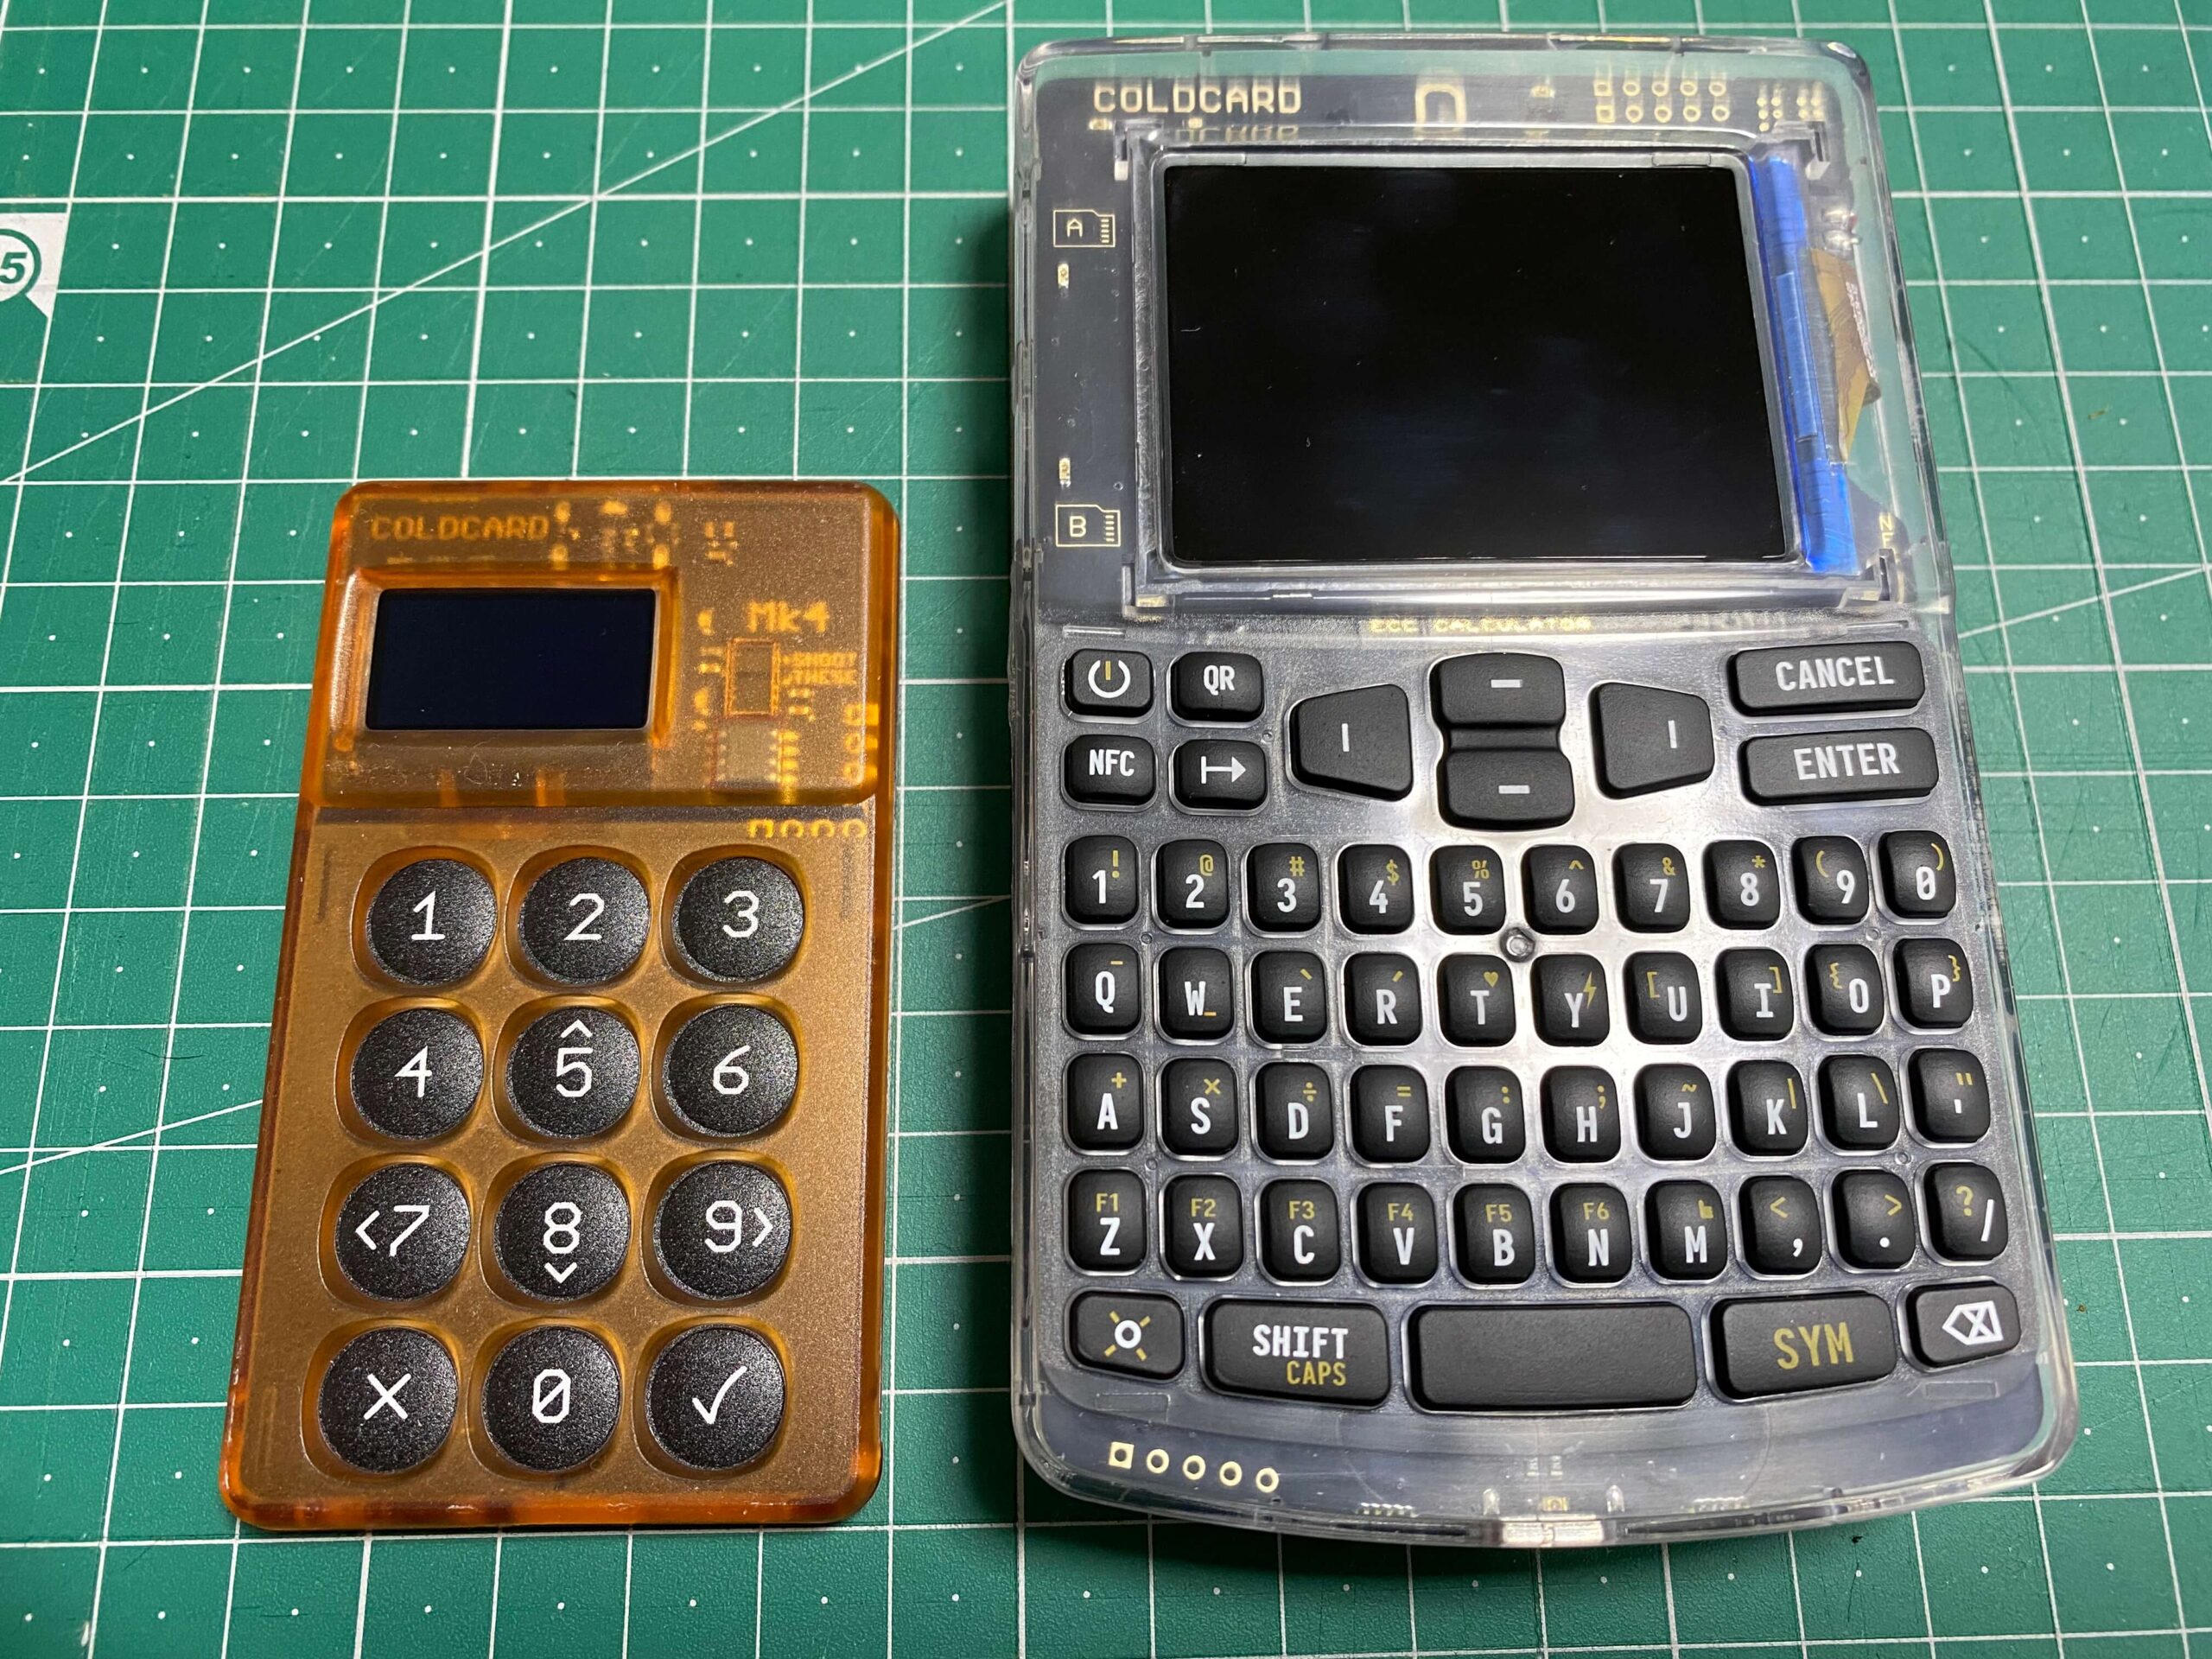
As of 2024, the available models are "COLDCARD Mk4" and "COLDCARD Q."
Comparing the two, the COLDCARD Mk4 features a compact and simple design operated with 12 buttons. On the other hand, the COLDCARD Q comes with a full QWERTY keyboard, a large LCD screen, and a QR code scanner. It can also be used with batteries, making offline transactions even more accessible.
Comparison Between COLDCARD Mk4 and COLDCARD Q
| COLDCARD Mk4 | COLDCARD Q | |
|---|---|---|
| Price* | $157.94 (approx. ¥24,800) | $219.99 (approx. ¥34,500) |
| Release Year | Mk4: 2022 (Mk1: 2018) | 2024 |
| Size (mm) | 88×52×10 | 120×75×22 |
| Weight | approx. 30g | 93g (without battery) |
| Power Supply Method | Mainly USB connection | Mainly battery (USB also possible) |
| Connection | USB-C / MicroSD card | USB-C / MicroSD card |
| Operation Method | 12-button operation | Keyboard operation |
| QR Code Scanner | No | Yes |
| Color Options | 10 colors | 1 color |
Prices converted to yen are based on the exchange rate as of May 2024.
Shipping costs are extra.

The COLDCARD Q seems convenient with keyboard input and QR code functionality!
If you prioritize price and compactness, the Mk4 would be the better choice.
This article explains how to use the COLDCARD Q, which was released in 2024.

Points to Note When Purchasing
Always buy COLDCARD from the official site.
It's hazardous to purchase a hardware wallet that has been previously opened, as it may have been tampered with. Avoid using second-hand marketplace apps or unreliable e-commerce sites.
Although COLDCARD is indeed more expensive compared to other hardware wallets, buying it from a suspicious site at a lower price is a big no-no.


It's crucial to avoid ending up with a compromised wallet from the start since it will manage your valuable assets.
Official COLDCARD Website
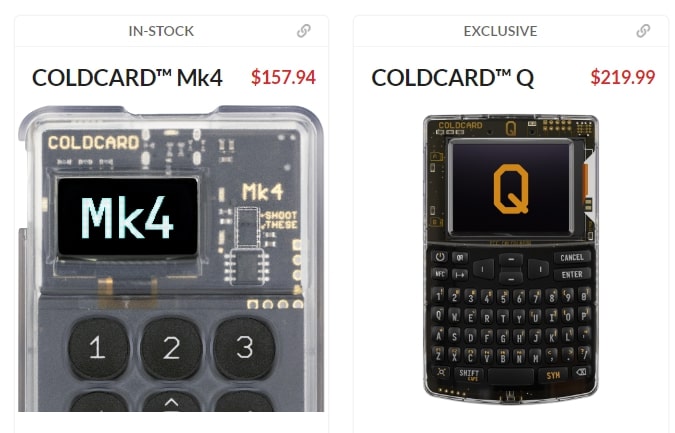
Be cautious of fake sites when accessing the official COLDCARD website.
Even when using the link below, ensure to verify the displayed URL.
COLDCARD Official Site (Coinkite)
When following the link from COLDCARD's official Twitter account, also ensure the account is genuine.
Checking whether many knowledgeable Bitcoiners follow the account can help verify its authenticity.

How to Purchase COLDCARD
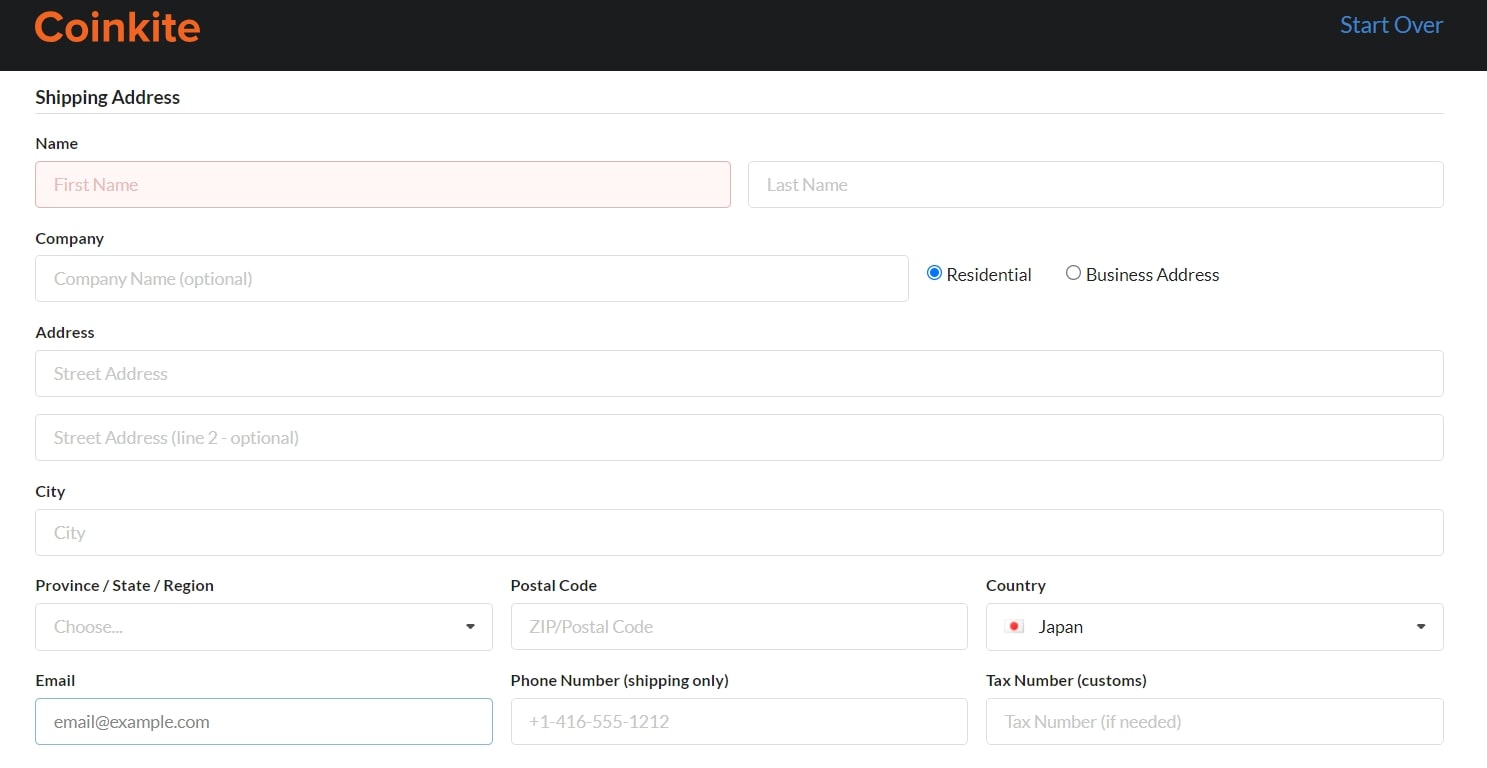
Access the official COLDCARD website and select the desired device to purchase.
As the official site is currently not available in Japanese, those who are not proficient in English should use tools like Google Translate.
Purchasing Process
- Click "BUY NOW"
- Select the desired device and color, then add it to the cart
- Check the confirmation details and proceed to checkout
- Enter your email address, phone number, shipping address, shipping method, and payment method
- Review your order details and terms of service, then place your order
When I (Minami) bought the COLDCARD Q, the shipping fee was $31.8 (about ¥4,600). It was on backorder, so I made a reservation, and it arrived in about 3-4 weeks. ※As of May 2024


Since you're shopping on an overseas site, customs duties might apply. The usual payment methods for customs duties are either paying directly to the delivery carrier upon receipt or pre-paying online during shipping.
For those not accustomed to this, it might be a bit confusing, so it's a good idea to research customs procedures beforehand.
Checking Your Delivered COLDCARD
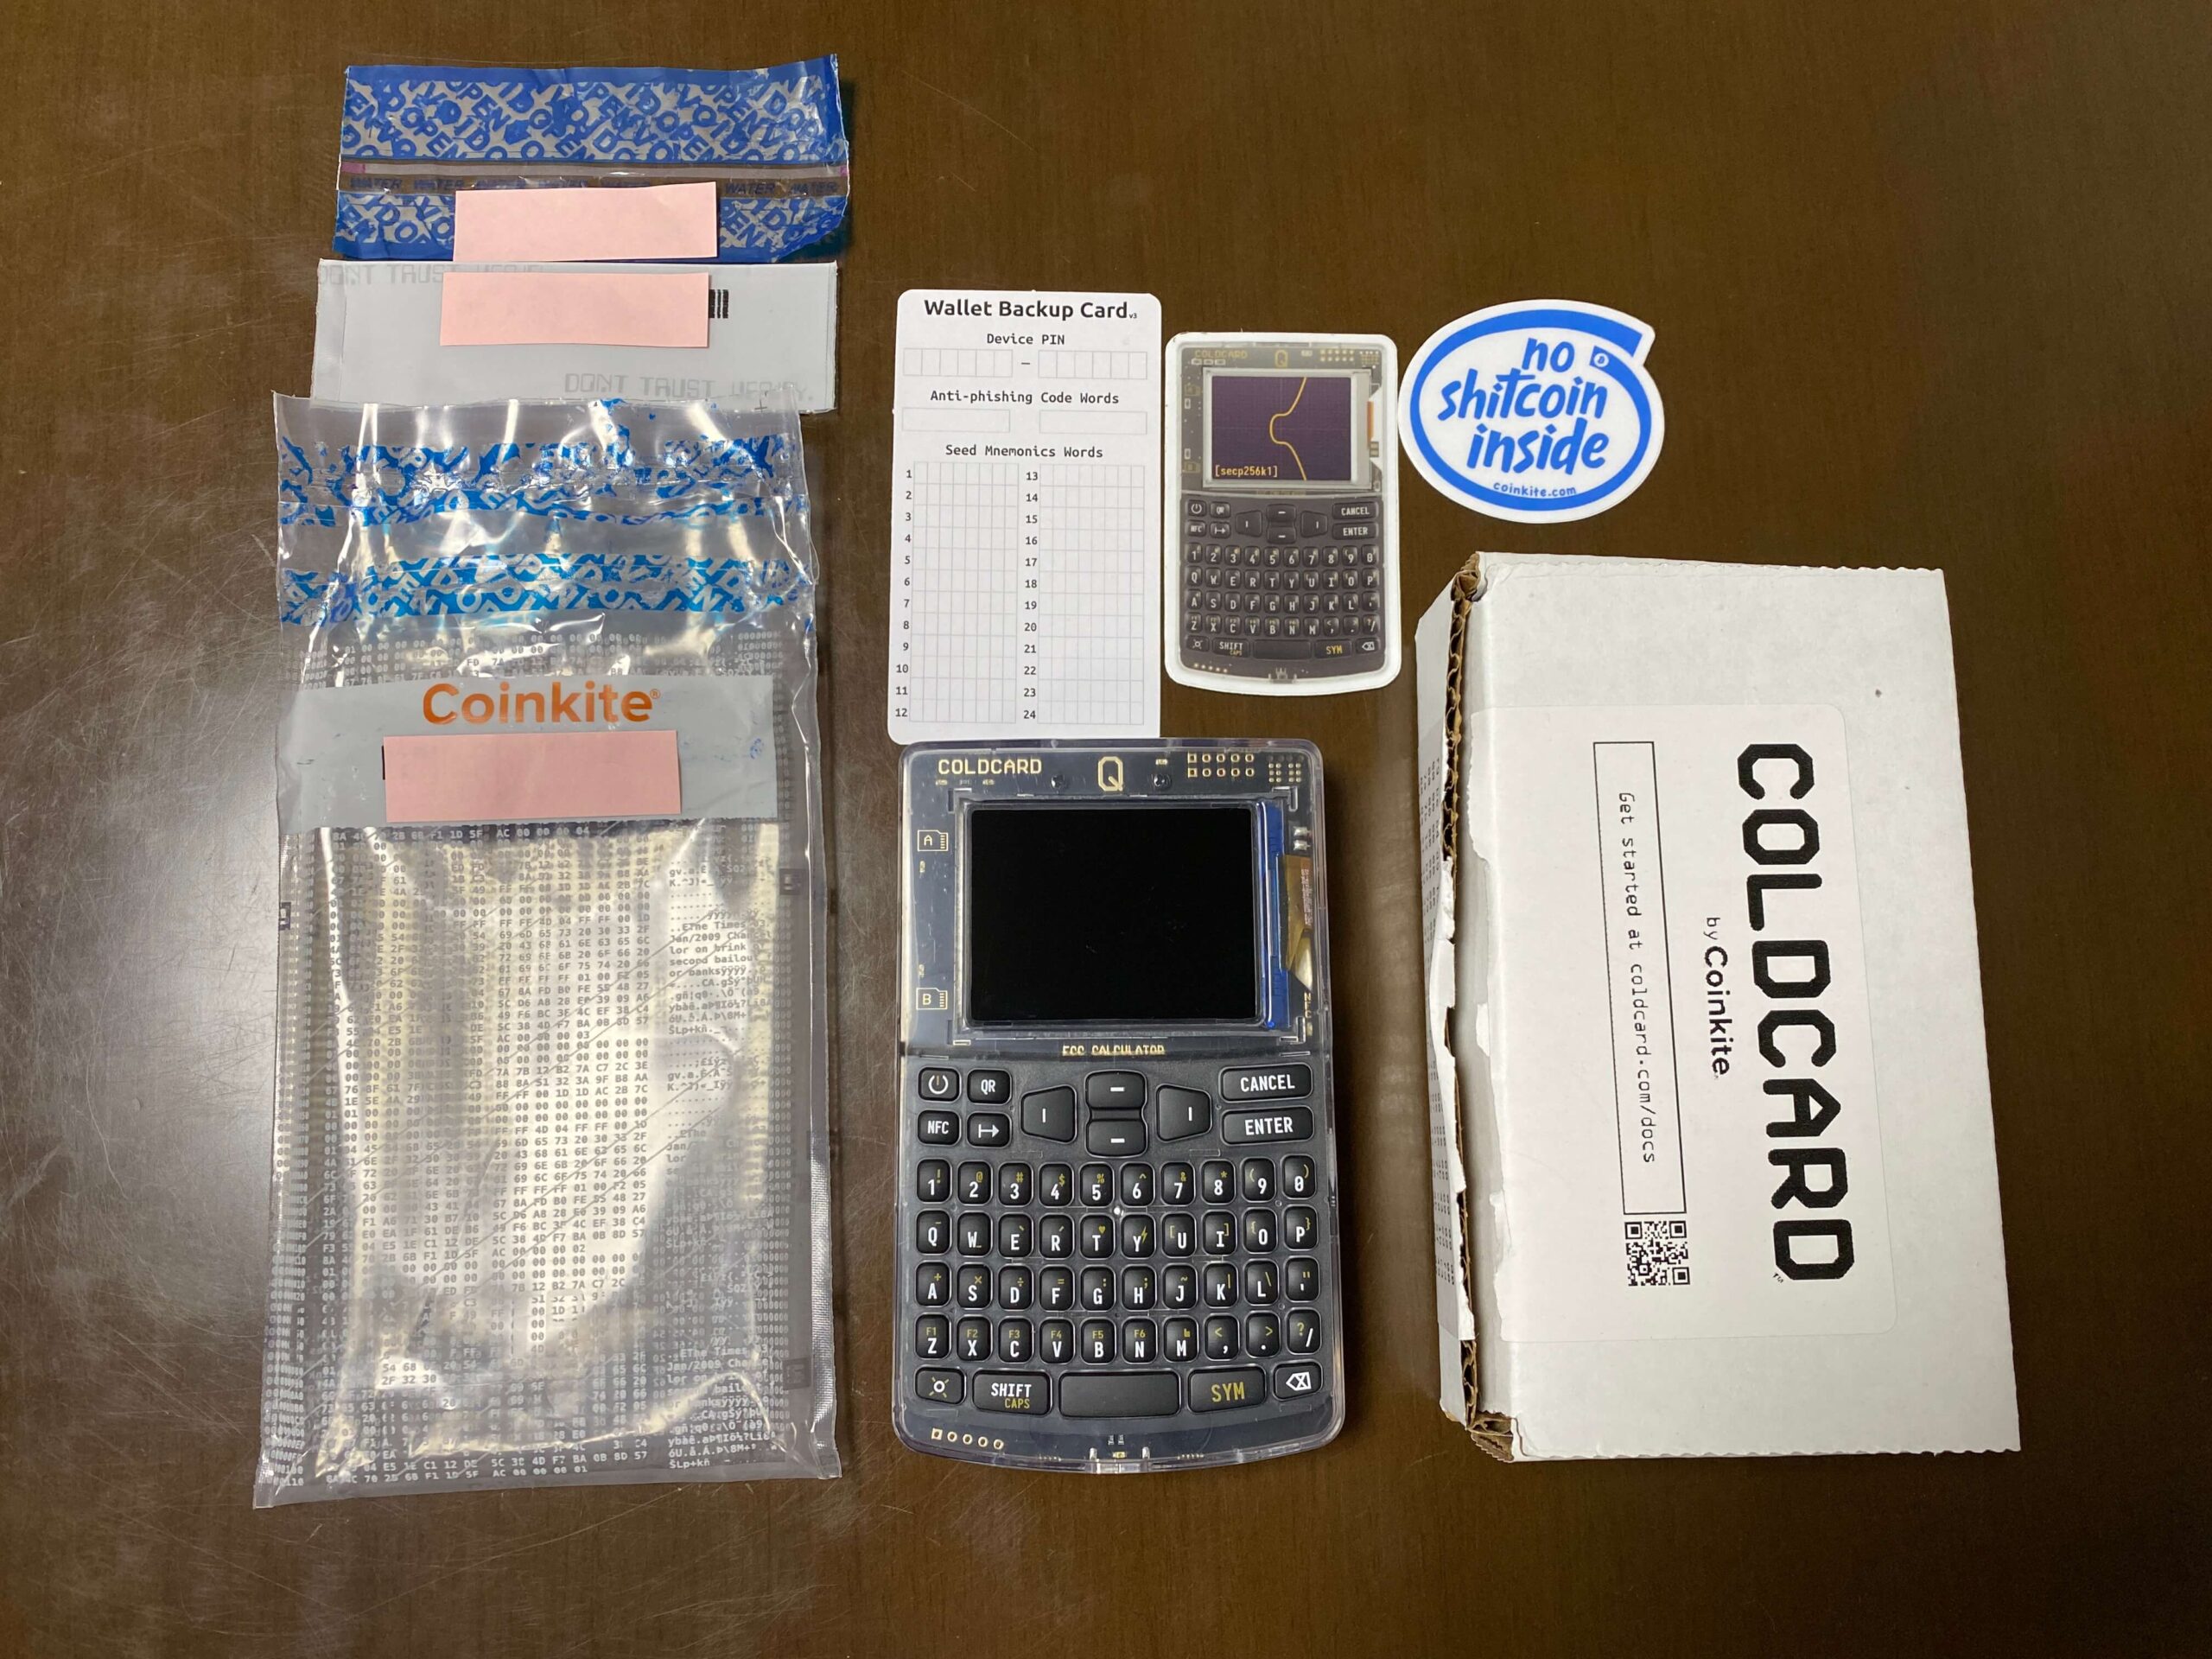
When your COLDCARD arrives, check for any signs of tampering on the box and inspect the contents. The seal on the bag will show the word "VOID" if it has been tampered with.
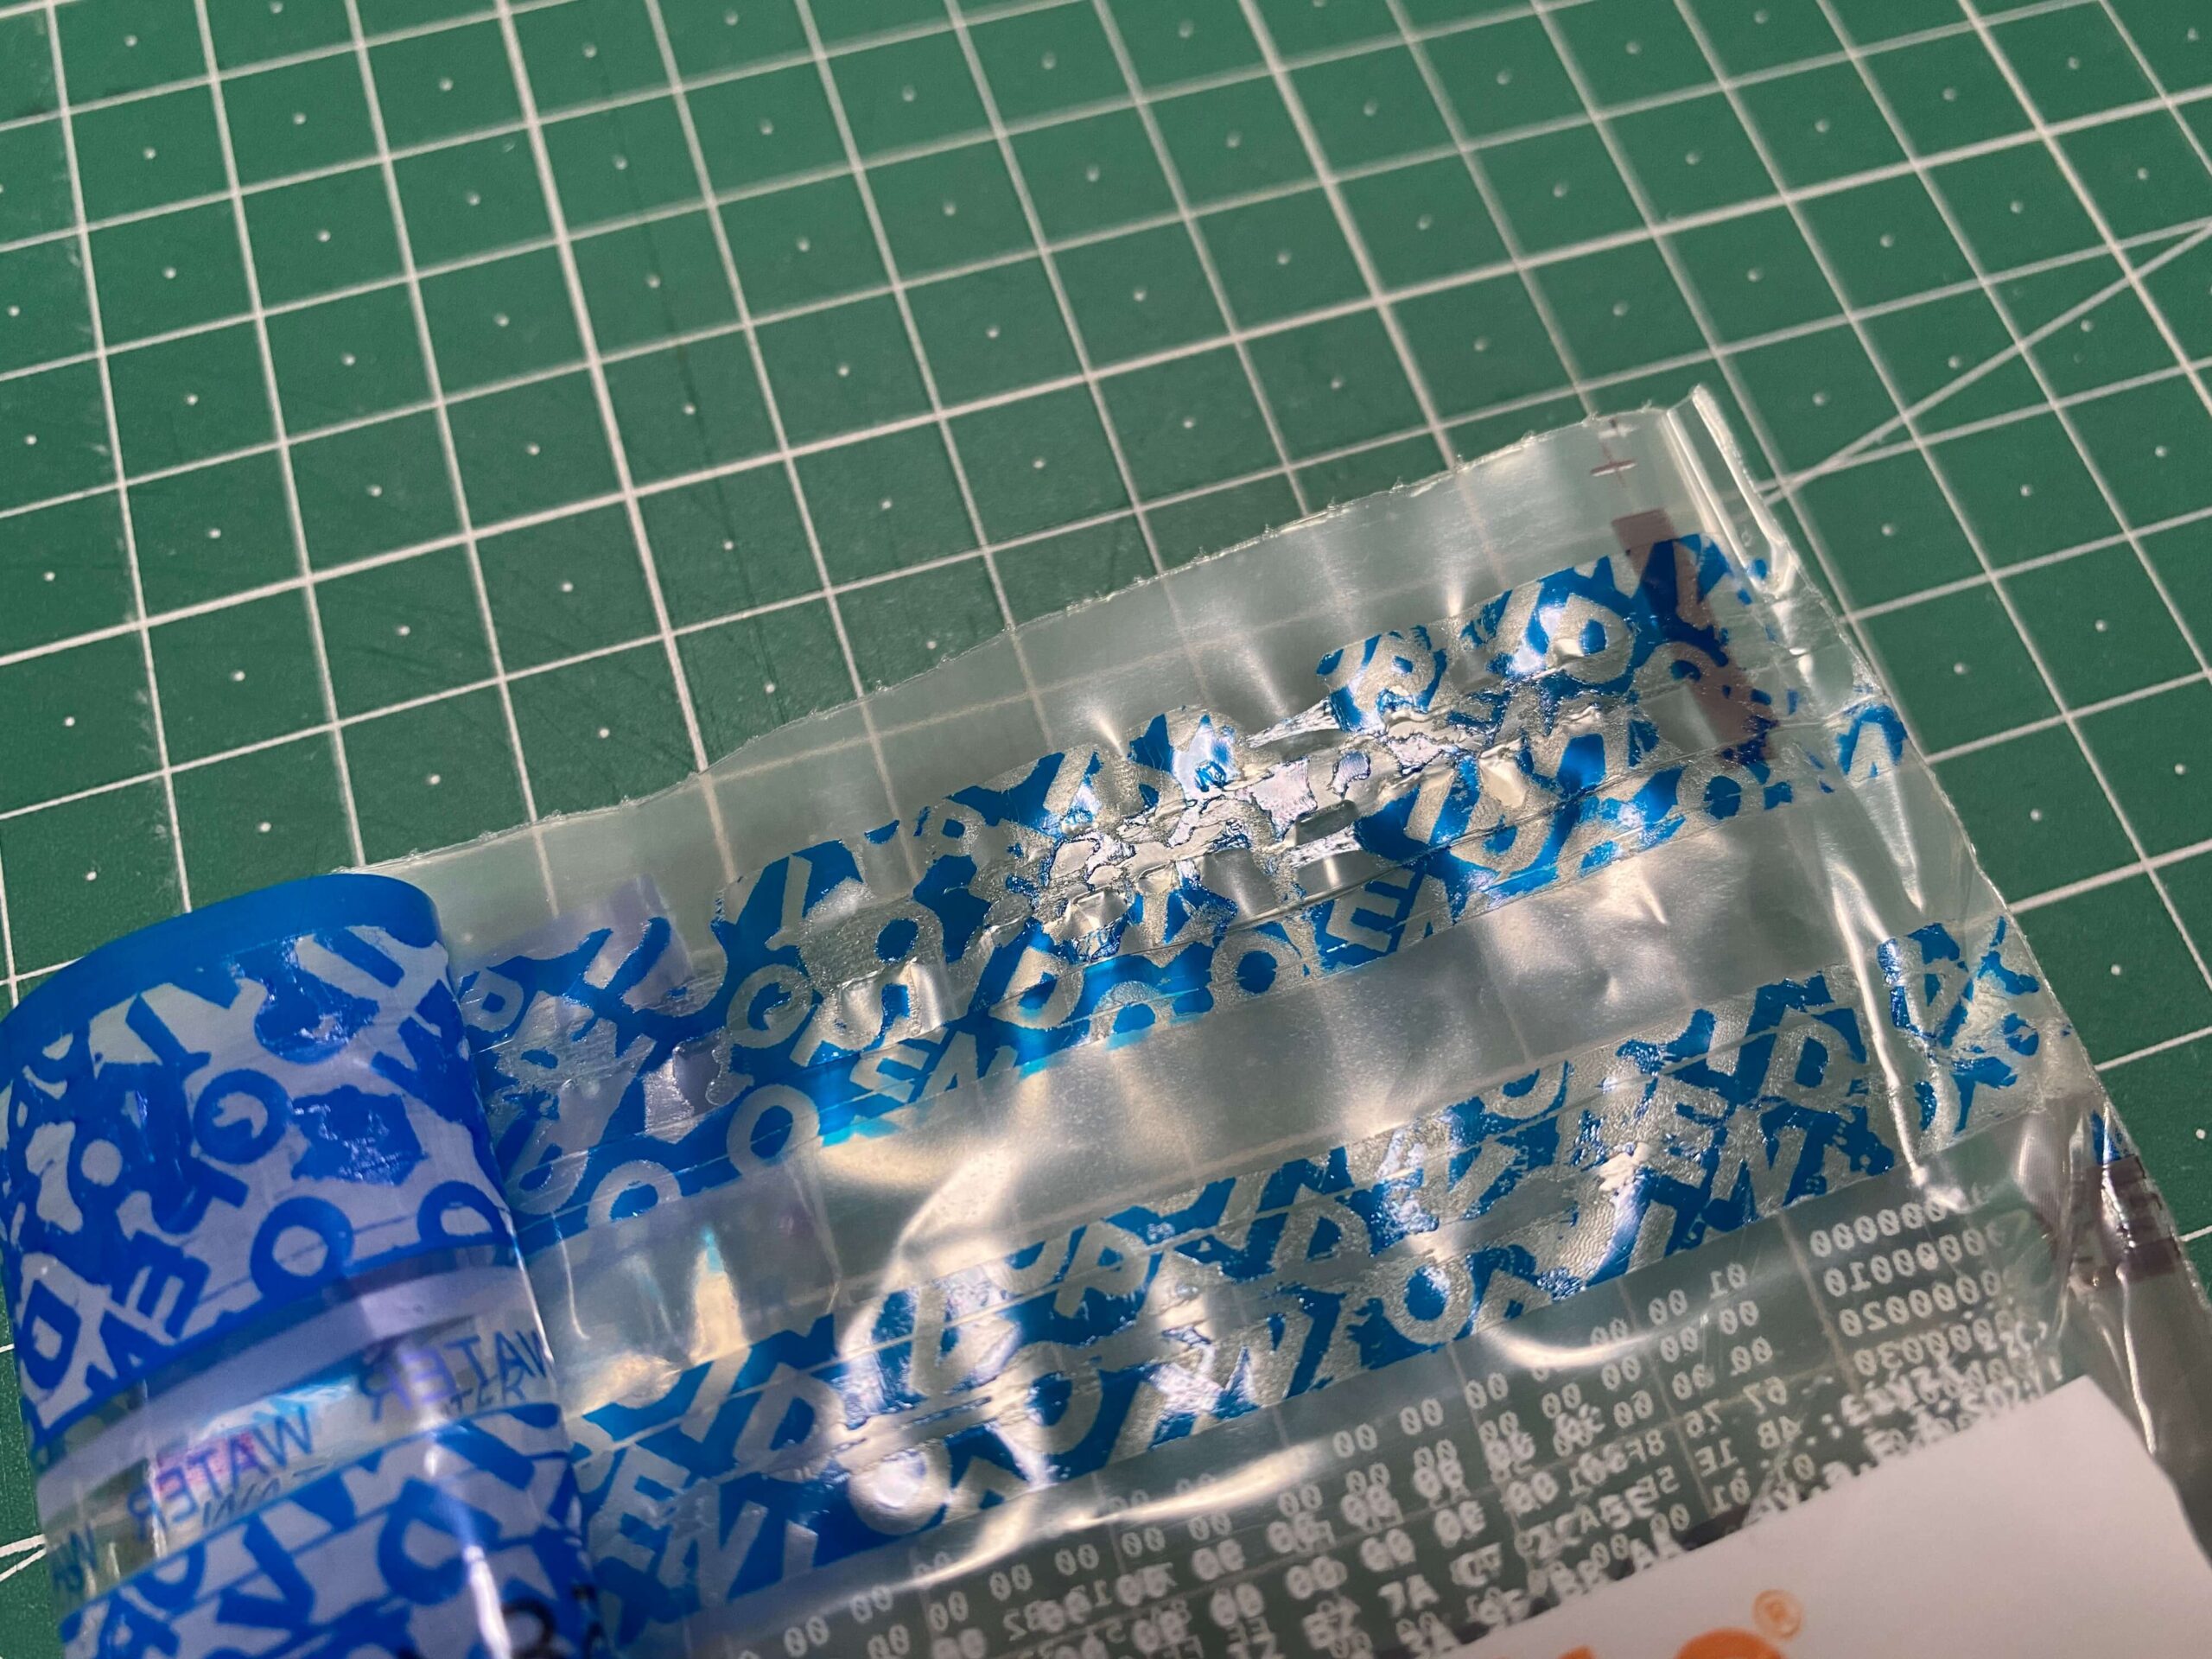
The bag, the seal on the bag, and the detached strip (cut off just before shipping) will all have matching serial numbers, so ensure they all match. This serial number will also be used during the initial setup of the device.
Contents of the COLDCARD Q Package
- COLDCARD Q device
- Wallet backup card
- 2 stickers
Additionally, you will need 3 AAA batteries and a MicroSD card.
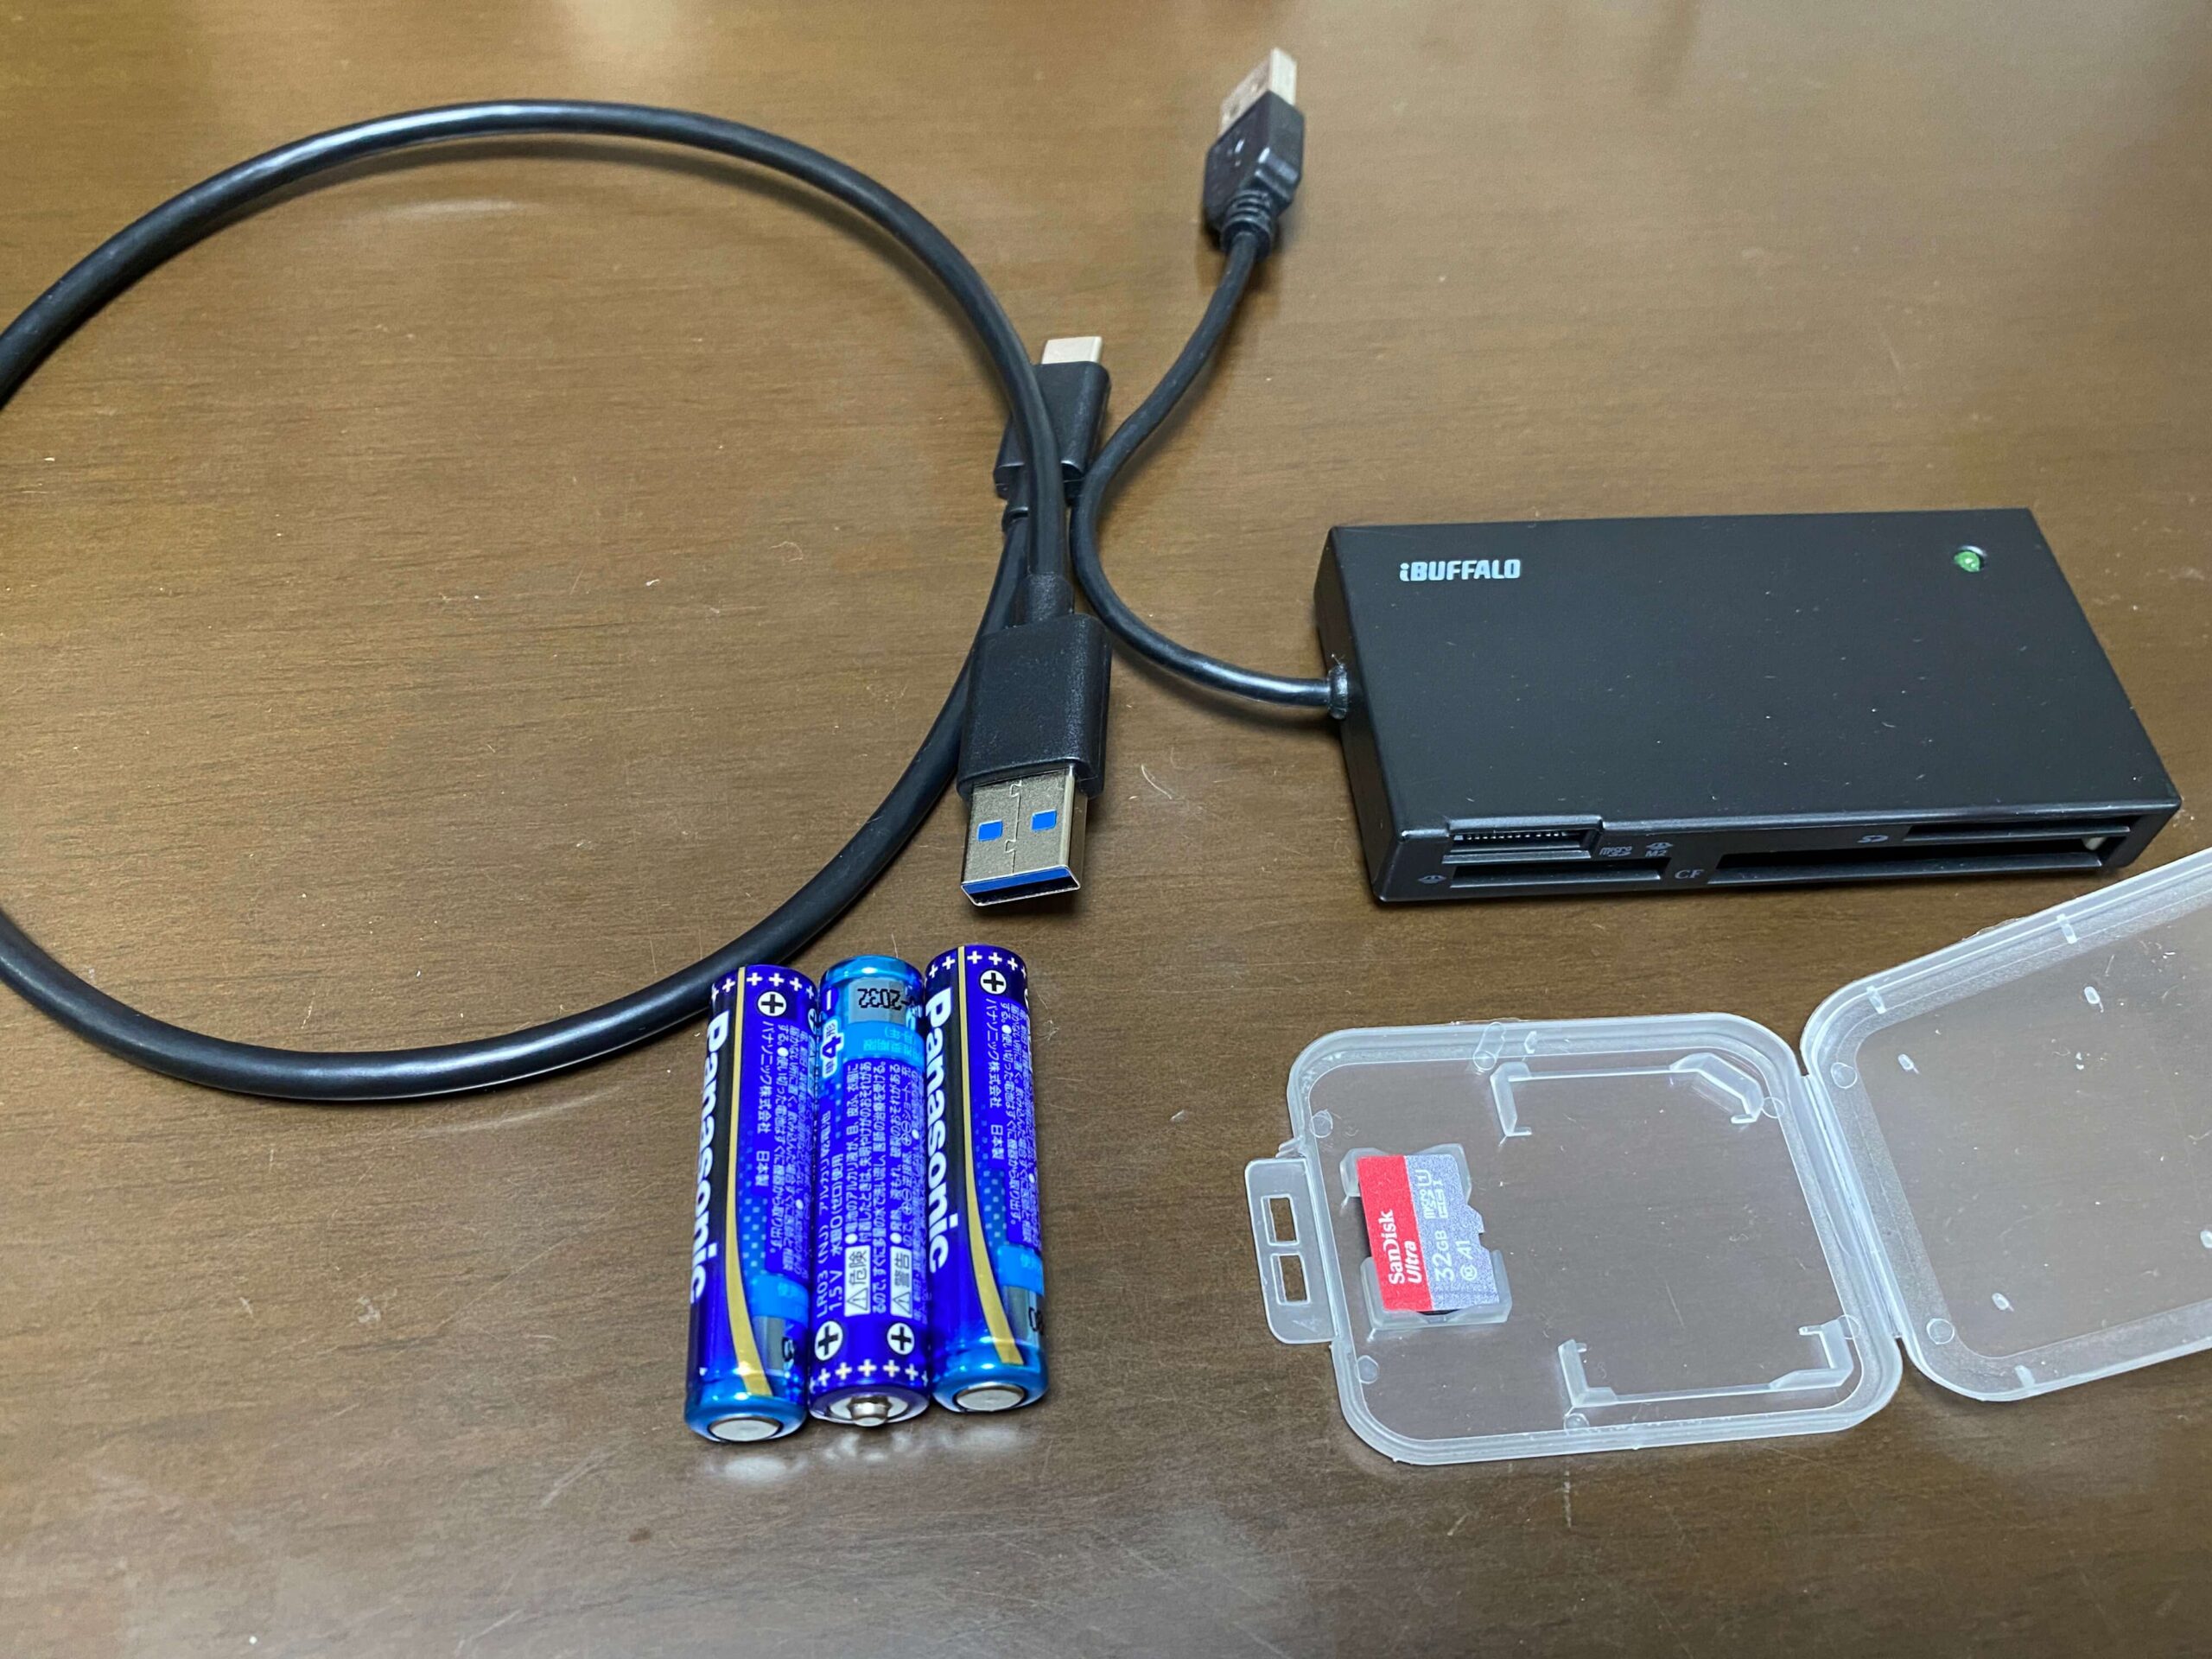
Items Needed for Using COLDCARD Q
- 3 AAA batteries
- MicroSD card (32GB or less)
- MicroSD card reader (for inserting into PC)
- USB-C connector (not needed if planning air-gapped operation)

The author (Minami) had a USB-C connector on hand just in case, but I never ended up using it during the setup or sending process.
It's highly recommended to have plenty of time and not rush during the initial setup of your COLDCARD.
The initial setup itself takes about an hour, but including recovery seed simulations and transaction tests, it might be best to allocate about three hours to ensure everything is done correctly.

How to Use COLDCARD Q
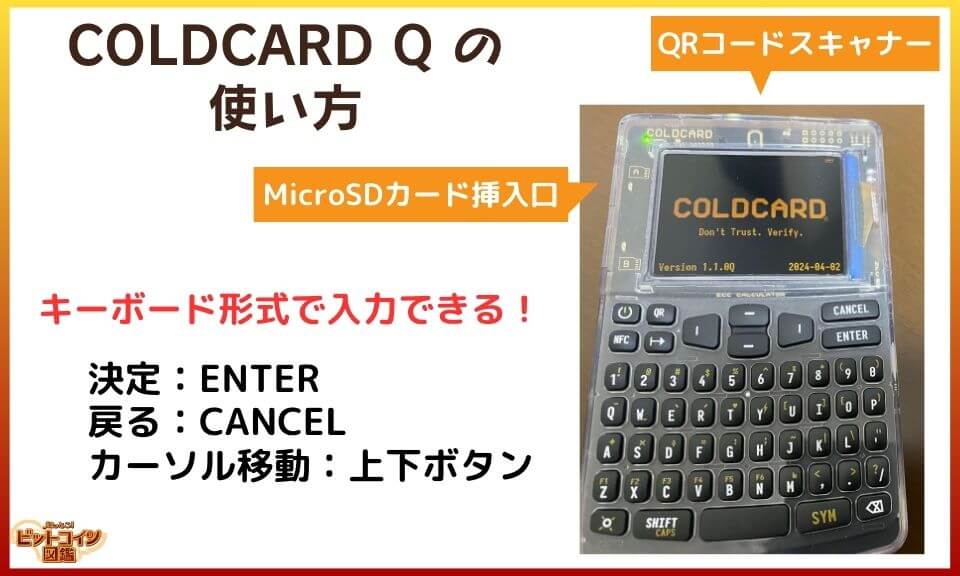

I want to know how to set up and use the COLDCARD!
COLDCARD operations are entirely in English, so it might be a bit daunting if you're not confident with the language.
If you encounter any unfamiliar terms, take your time, and don't rush through the setup.

The following instructions are based on the status as of May 2024.
When using the device, please check the latest information and carefully read the contents displayed on the site and device to use COLDCARD correctly.
As for COLDCARD, the COLDCARD article written by Katakoto-san is very easy to understand, so I would appreciate it if you also check it.
COLDCARD Mk4 setup article ↓
https://lostinbitcoin.jp/how-to/coldcardguide03/
Powering on the COLDCARD
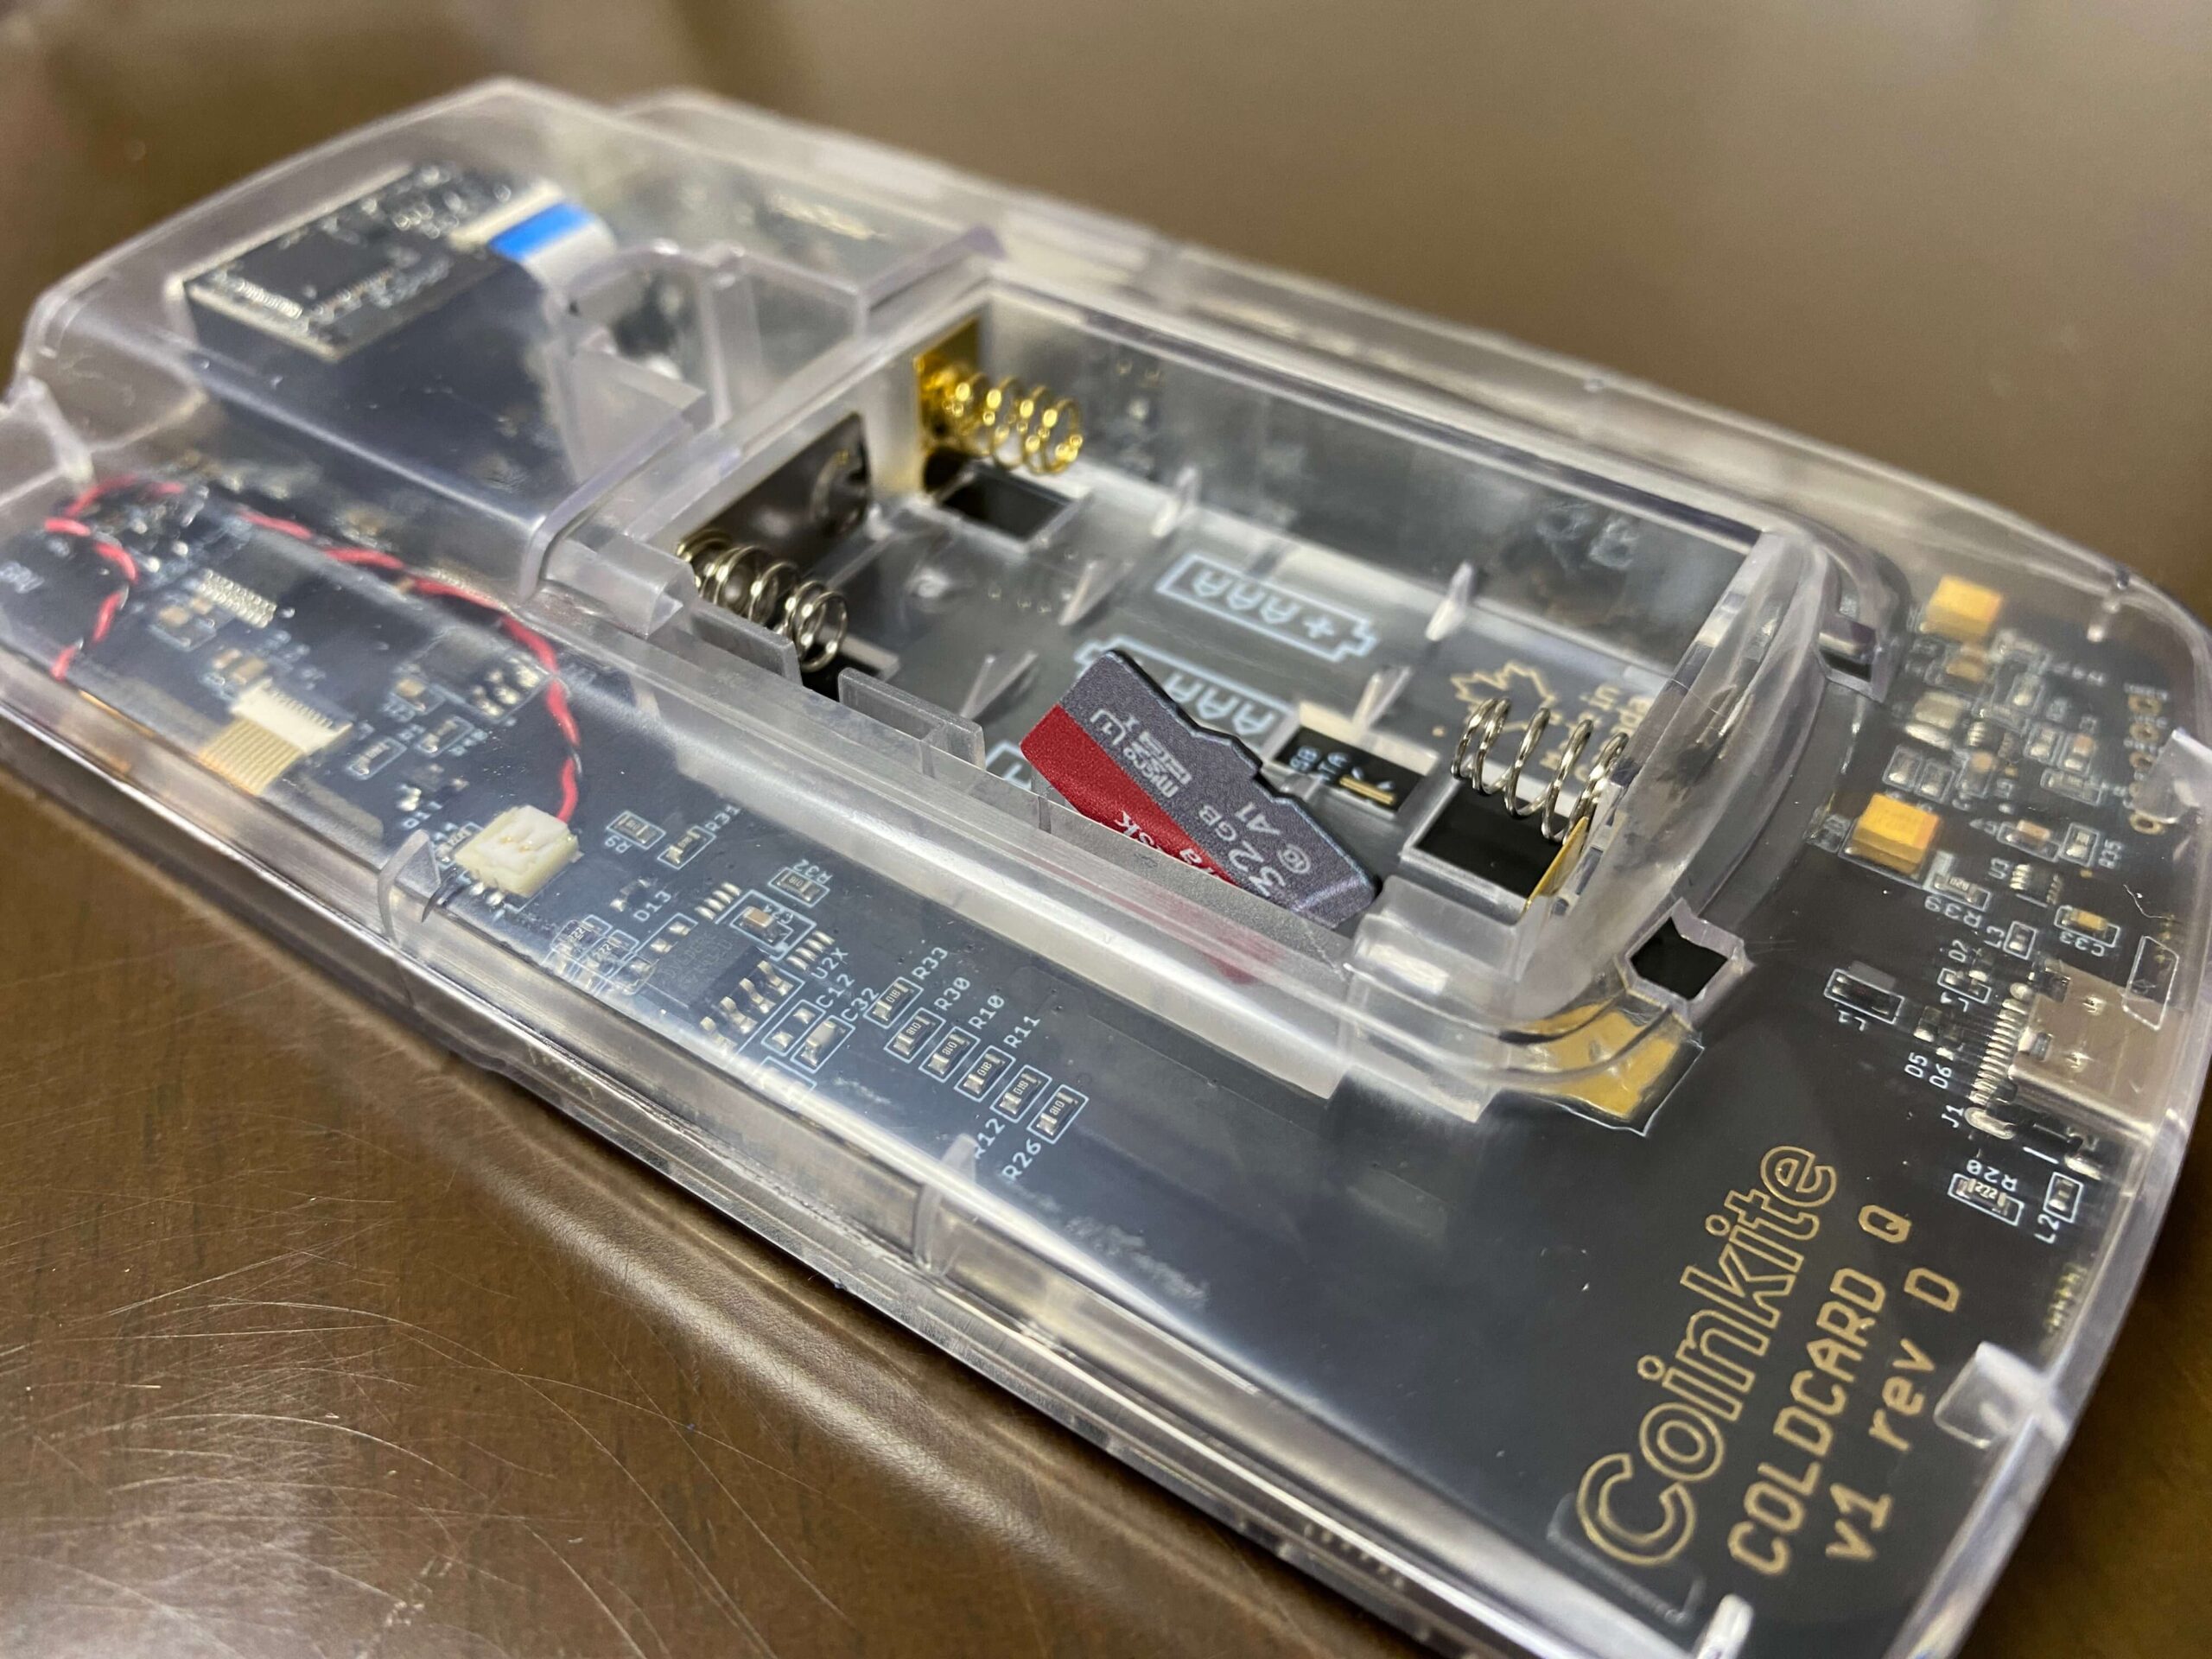
Insert three AAA batteries into the device and press the power button at the top left.

The power button is a long push!
Use the up and down buttons to scroll through the text, and press ENTER to proceed.

Device Display Content
By Using this product, you are accepting our Terms of Sale and Use.
Read the full document at:
coldcard.com/legal
Press ENTER to accept terms and continue.
I couldn't find coldcard.com/legal, so here is a link to/terms.
https://coinkite.com/terms
Device Display Content
Your new Coldcard should have arrived SEALED in a bag with the above number. Please take a moment to confirm the number and look for any signs of tampering.
Take pictures and contact support@coinkite if you have concerns.
Make sure the number displayed on the device matches the serial number on the sealed bag.


You can proceed by pressing ENTER.
Setting Up the PIN Code
Initial Menu
- Choose PIN Code
- Advanced/Tools
- Bag Number
Select Choose PIN Code to set up your PIN code.
The PIN code is divided into two parts: a prefix and a suffix, with a maximum length of 12 characters (6 characters for each part).
Device Display Content
Choose PIN
Pick the main wallet’s PIN code now. Be more clever, but an example:
123-4567
It has two parts: prefix(123-) and suffix(-4567). Each part must be between 2 to 6 digits long. Total length can be as long as 12 digits.
The prefix part determines the anti-phishing words you will see each time you login.
Your new PIN protects access to this Coldcard and is not a factor in the wallet’s seed words or private keys.
THERE IS ABSOLUTELY NO WAY TO RECOVER A FORGOTTEN PIN! Write it down.
Device Display Content
WARNING
There is ABSOLUTELY NO WAY to ‘reset the PIN’ or ‘factory reset’ the Coldcard if you forget the PIN.
DO NOT FORGET THE PIN CODE.
Press (6) to prove you read to the end this message.

I thought you could somehow recover if you forgot the PIN code, but with COLDCARD, if you forget it, there's no way to recover it!
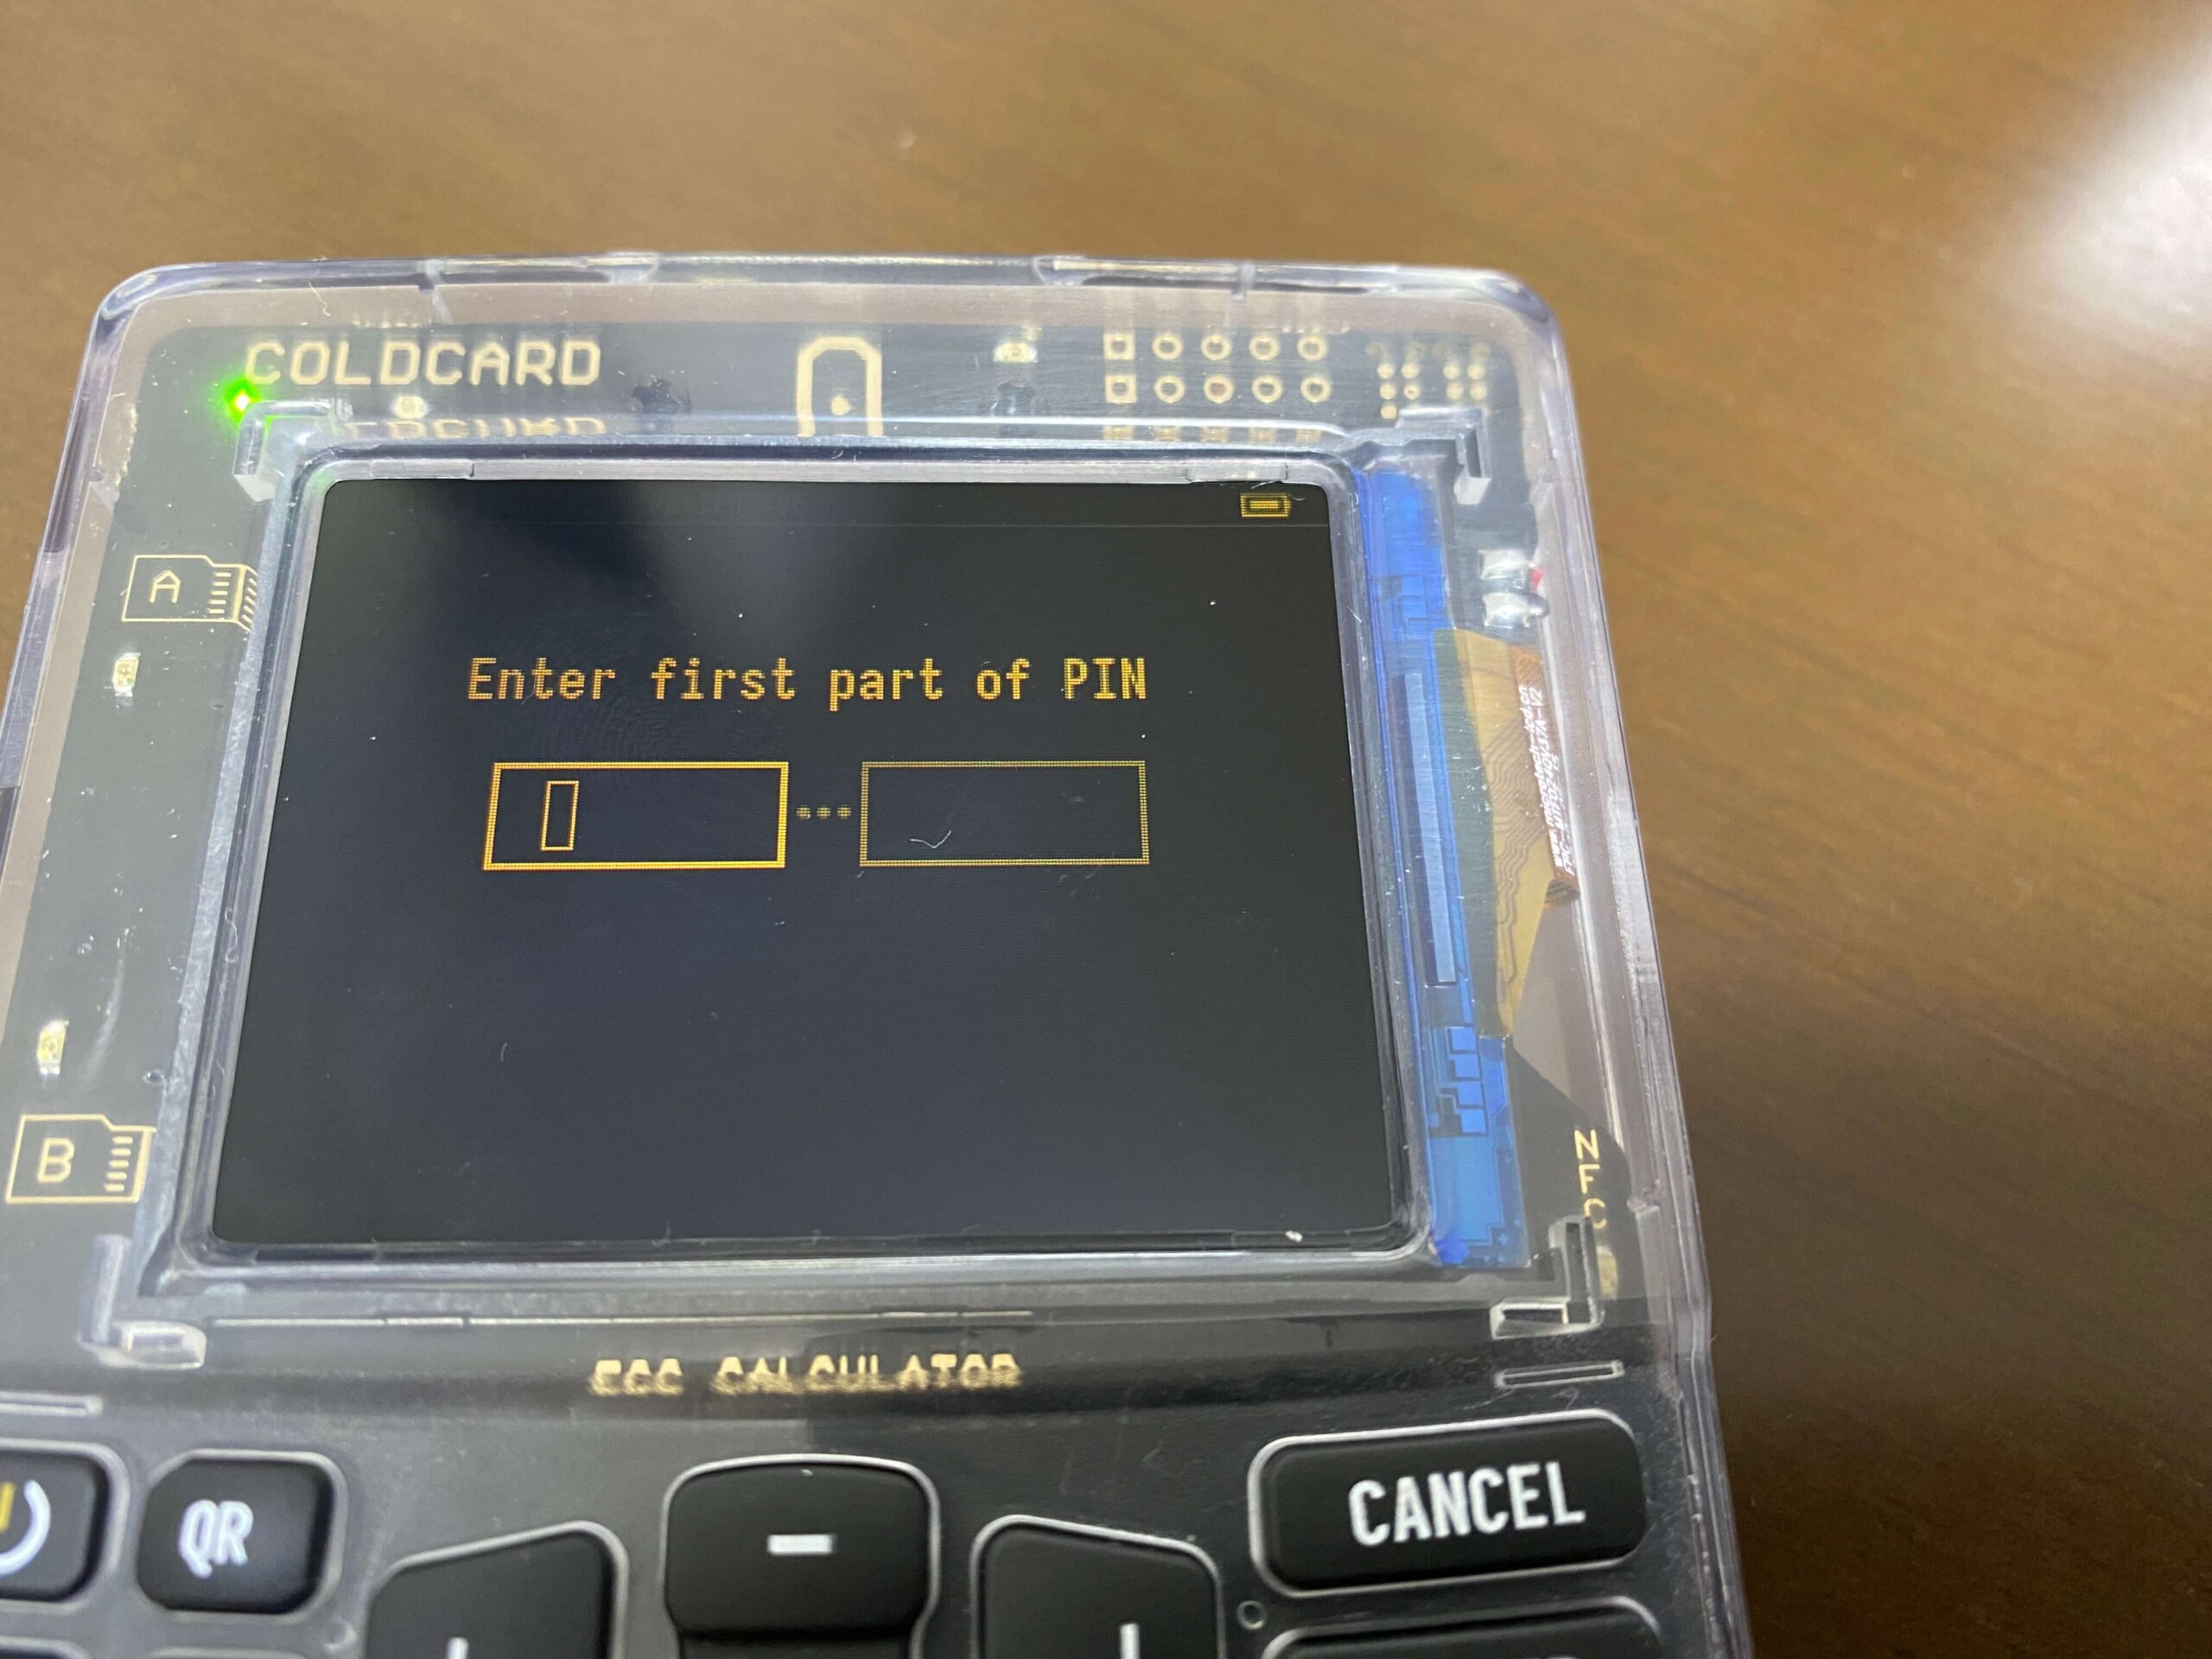
An important feature of COLDCARD is the anti-phishing words displayed when you enter the PIN code.

When you enter the first part of the PIN, two words will appear on the screen. These are anti-phishing code words, and they will differ even if the same PIN is set on another device.
Each time you log in and enter the first part of the PIN, these anti-phishing words will be displayed. If the COLDCARD has been tampered with, different words will appear, alerting you immediately.
Device Display Content
- Enter first part of PIN
- Enter second part of PIN
After entering and confirming the PIN code, the setup is complete.
If you're worried, you can try turning off the device and see if you can log back in with the set PIN code.


I once entered the wrong first part of the PIN, and seeing completely different anti-phishing words really scared me!
Menu Screen
After setting the PIN code, the menu screen will expand with more options.
Menu Screen Display
- New Seed Words
- Migrate COLDCARD
- Import Existing
- Advanced/Tools
- Settings
Advanced/Tools Menu
- View Identity
- Temporary Seed
- Upgrade Firmware
- File Management
- Paper Wallets
- Perform Selftest
- I Am Developer
Settings Menu
- Login Settings
- Hardware On/Off
- Multisig Wallets
- Display Units
- Max Network Fee
- Idle Timeout
- Idle Timeout (on battery)
- LCD Brightness (on battery)
- Delete PSBTs
- Menu Wrapping

The English options might be a bit intimidating if you're not confident with the language!
There are many options, but there's one thing you should do before proceeding with the setup.

Upgrading Firmware for COLDCARD Q
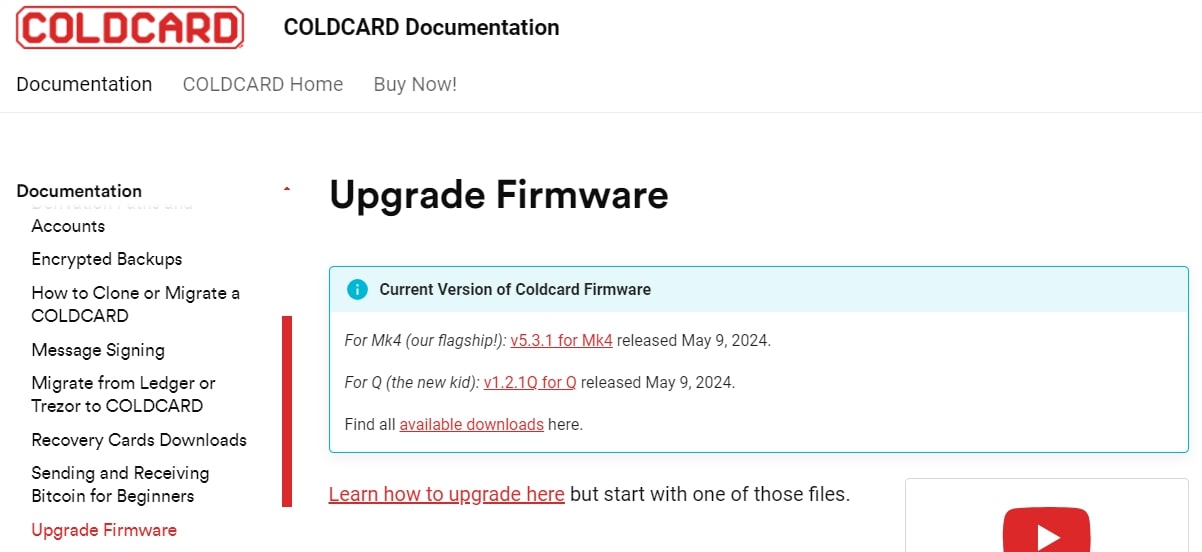
It is recommended to upgrade the firmware before starting the setup.
The latest updates may include bug fixes and enhance security, especially if any tampering occurred during the device's shipment.
Check the Latest Version of COLDCARD Q Firmware on the Official Website
https://coldcard.com/docs/upgrade
Check the URL and download the latest firmware, then save it to a MicroSD card.
From the menu, go to Advanced/Tools → Upgrade Firmware, and select Show Version to check the current version. Select From MicroSD to see the following message:
Device Display Content
Please insert a MicroSD card before attempting this operation.
The MicroSD card slot is at the top left of the device. Insert it according to the illustration.


It should stick out slightly when inserted correctly.
When the MicroSD card is inserted, the file name will appear on the screen. Press ENTER to proceed.
Device Display Content
Install this new firmware?
Binary checksum and signature will be further verified before any changes are made.
Before installation, the file is verified for integrity (checksum) and authenticity (signature) to prevent installing a malicious file.


Pressing ENTER will start the upgrade, and it will complete after a short wait.
Create a Wallet

Finally, it's time to set up the seed phrase!
Press "New Seed Words" from the menu to proceed to the selection of 12 words, 24 words, or Advanced.
The 12-word seed phrase for Coldcard is highly random, making it sufficient for security. If you prefer to memorize it along with recording, 12 words can be chosen. Additionally, many people add a passphrase after selecting 12 words.
If you choose the 12-word option:
Record these 12 secret words!
Please check and double check your notes. There will be a test!
Press(4) to add some dice rolls into the mix. Press(QR) to view as QR Code.
Press 1-6 for each dice roll to mix in.
0 rolls so far
Coldcard's randomness is already very high, but if you're still concerned, you can enhance it by rolling dice to create a more random seed phrase.
If you want to add dice rolls, press (4) to proceed.


Some people roll the dice 50 times, others 100 times; it varies.
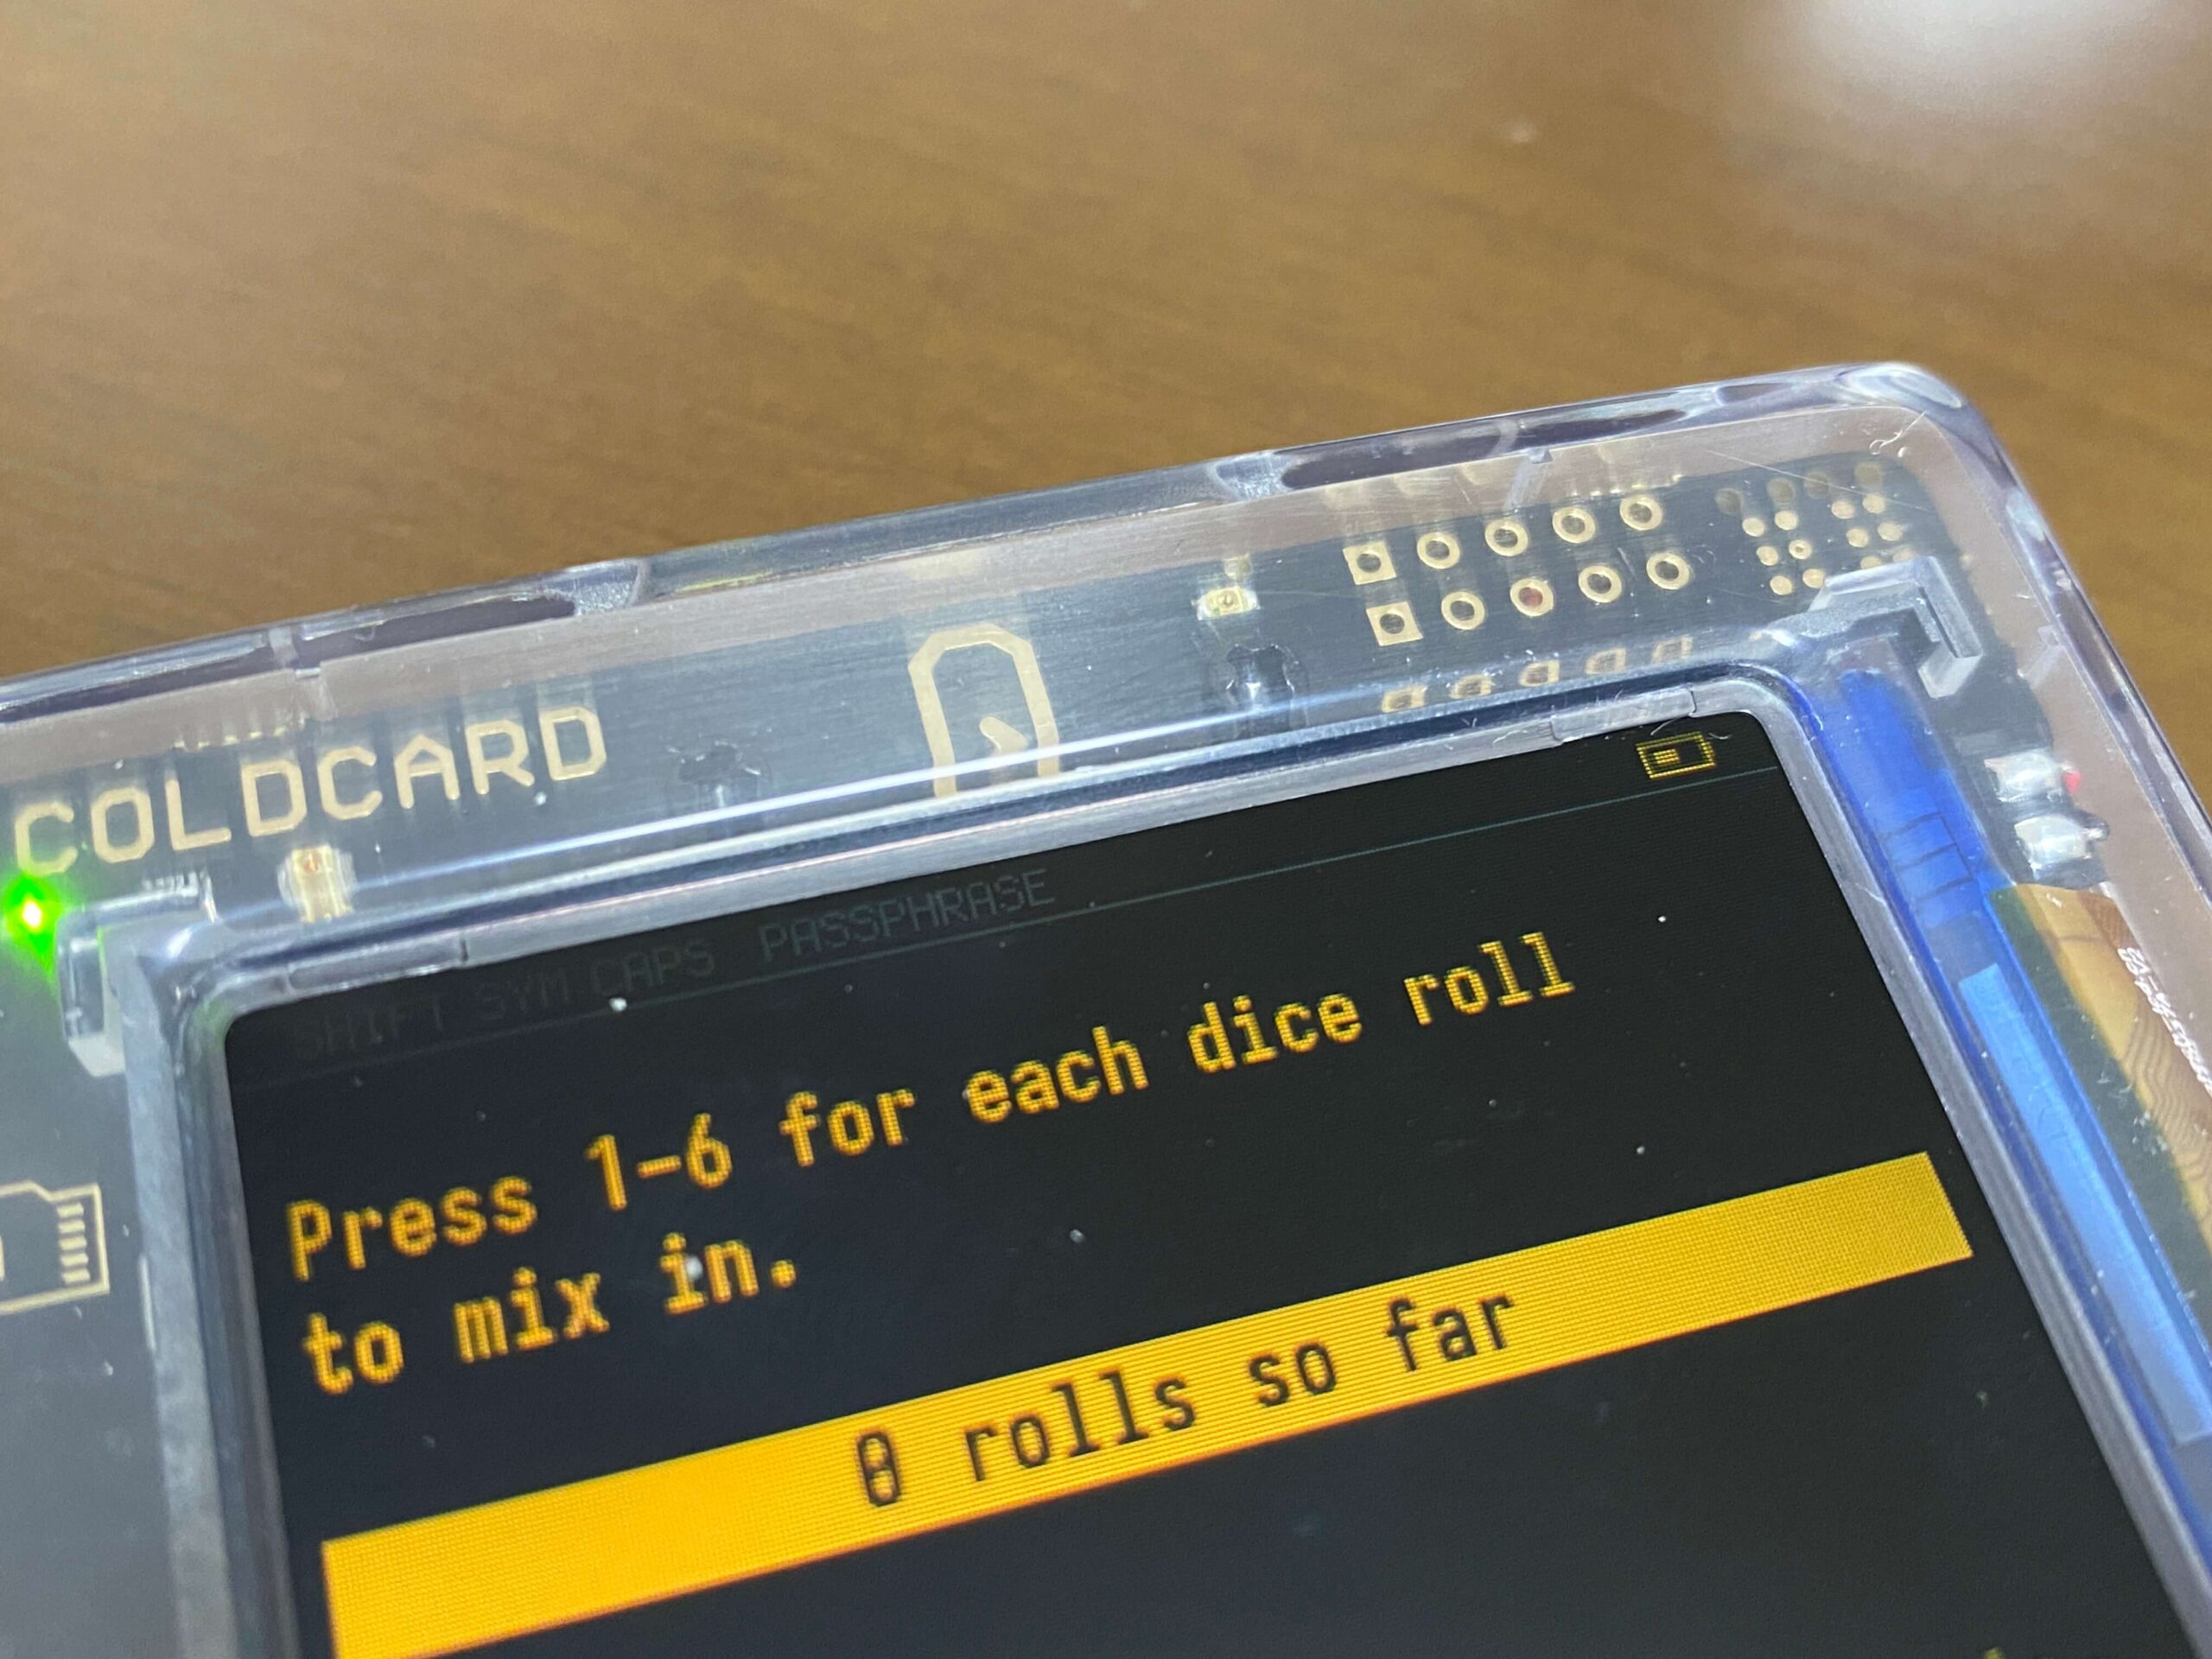
On the above screen, roll the dice and enter the numbers shown on the keyboard.
Decide how many times you'll roll the dice, and when done, press ENTER.


Then, write down the seed phrase that appears and keep it safe!
If you lose the seed phrase, you won't be able to access your Bitcoin, and if a third party discovers it, your assets could be stolen.
Avoid taking photos or digital notes with your smartphone, as there's a risk of malware infection or hacking that could lead to leakage.

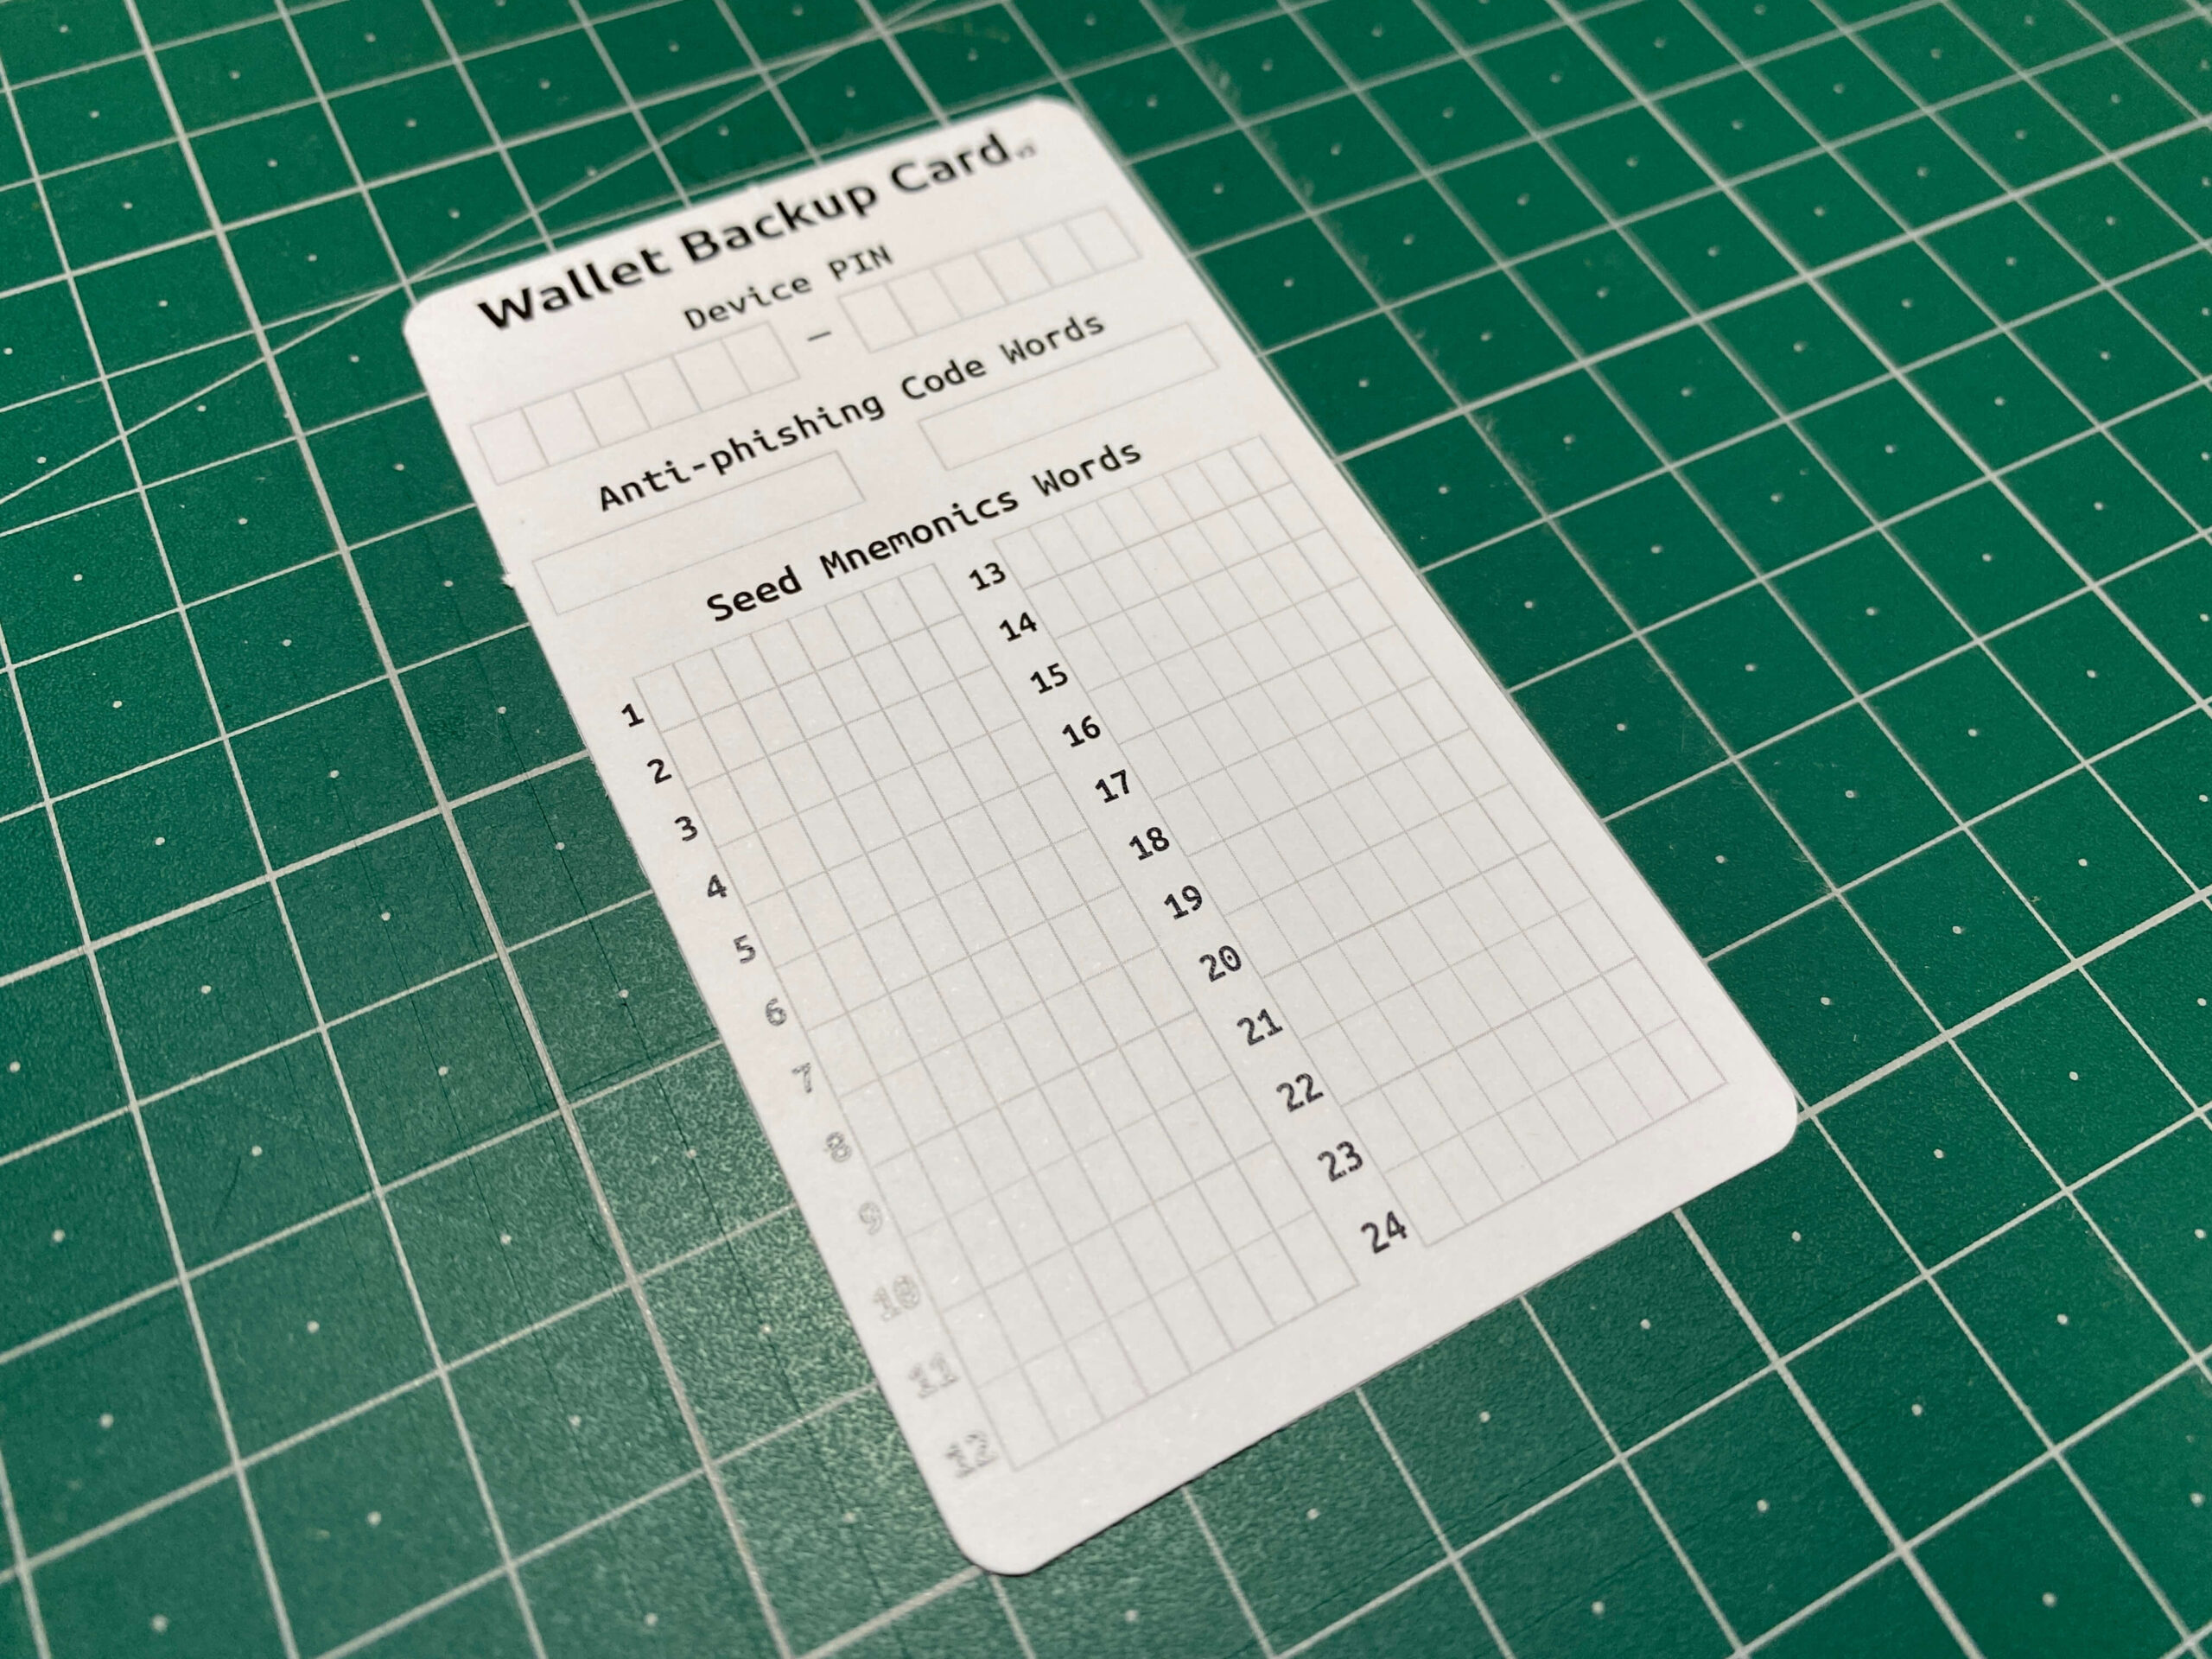
Confirm Seed Phrase
When the screen for selecting the seed phrase in a three-choice quiz format appears, choose the correct word while referring to your notes.
Device Display Content
Word ○ is?
1:
2:
3:
Which word is right?
CANCEL to give up, ENTER to see all the words again.
Device Display Content
Welcome!
Your COLDCARD has been configured for best security practices:
-USB disabled
-NFC disabled
-VirtDisk disabled
You can change these under Settings > hardware On/Off.
Menu Items Added
- Ready To Sign
- Passphrase
- Scan Any QR Code
- Address Explorer
Add a Passphrase
A passphrase is an optional string of characters that users can add in addition to the recovery seed. If the recovery seed is leaked, the passphrase can prevent immediate theft of funds, giving you time to move them to another wallet.
Even if using the same recovery phrase, "with passphrase" and "without passphrase" wallets are treated separately. You can use a wallet without a passphrase for daily transactions and small amounts, and a wallet with a passphrase for larger sums and long-term storage.
About Passphrases
- At least 12 characters are recommended
- Combine uppercase, lowercase, numbers, and symbols
- Avoid personal information or simple words
- Do not use words that are all from a dictionary

It might be a good idea to get used to operating without a passphrase first and then add a passphrase once you understand more about security.
Note that there is no function to confirm a passphrase. If you forget your passphrase, you will lose access.
Make sure to memorize it or store it securely, practicing daily to ensure you don't forget.

Device Display Content
Passphrase
You may add a passphrase to your BIP-39 seed words. This creates an entirely new wallet, for every possible passphrase.
By default, the Coldcard uses an empty string as the passphrase.
Please write down the fingerprint of all your wallets, so you can confirm when yor’ve got the right passphrase.(If you are writing down the passphrase as well, it’okay to put them together.) There is no way for the Coldcard to know if your entry is correct, and if you have it wrong, you will be looking at an empty wallet.
Limitations: 100 characters max length, ASCII characters 32-126(0x20-0x7e) only.
ENTER to continue or press(2) to hide this message forever.
Device Display Content
Above is the master key fingerprint of the new wallet created by adding passphrase to master seed [ ].
Press CANCEL to abort, ENTER to use the new wallet, (1) to apply and save to MicroSD for future.
When you enter the passphrase, the above number will be displayed each time.
It helps you confirm that the passphrase is entered correctly, so remember it together.

When you set or confirm a passphrase, an [8-digit number] will appear in the menu. Selecting this will give you access to the wallet with the passphrase set.
Preparing Sparrow Wallet
To check your balance and send Bitcoin, you need to link your Coldcard to a software wallet. Coldcard does not have a dedicated browser app but is compatible with various software wallets. In this guide, we'll use Sparrow Wallet for the operations.
For a detailed explanation of Sparrow Wallet, refer to Katakoto's Sparrow Wallet setup (within the COLDCARD article), which is very easy to understand.
https://lostinbitcoin.jp/how-to/coldcardguide03/
First, access the Sparrow Wallet official website. Make sure to verify the URL and access it from the official Twitter account (check if many Bitcoiners are following it) to avoid fake sites.
Sparrow wallet
https://sparrowwallet.com/
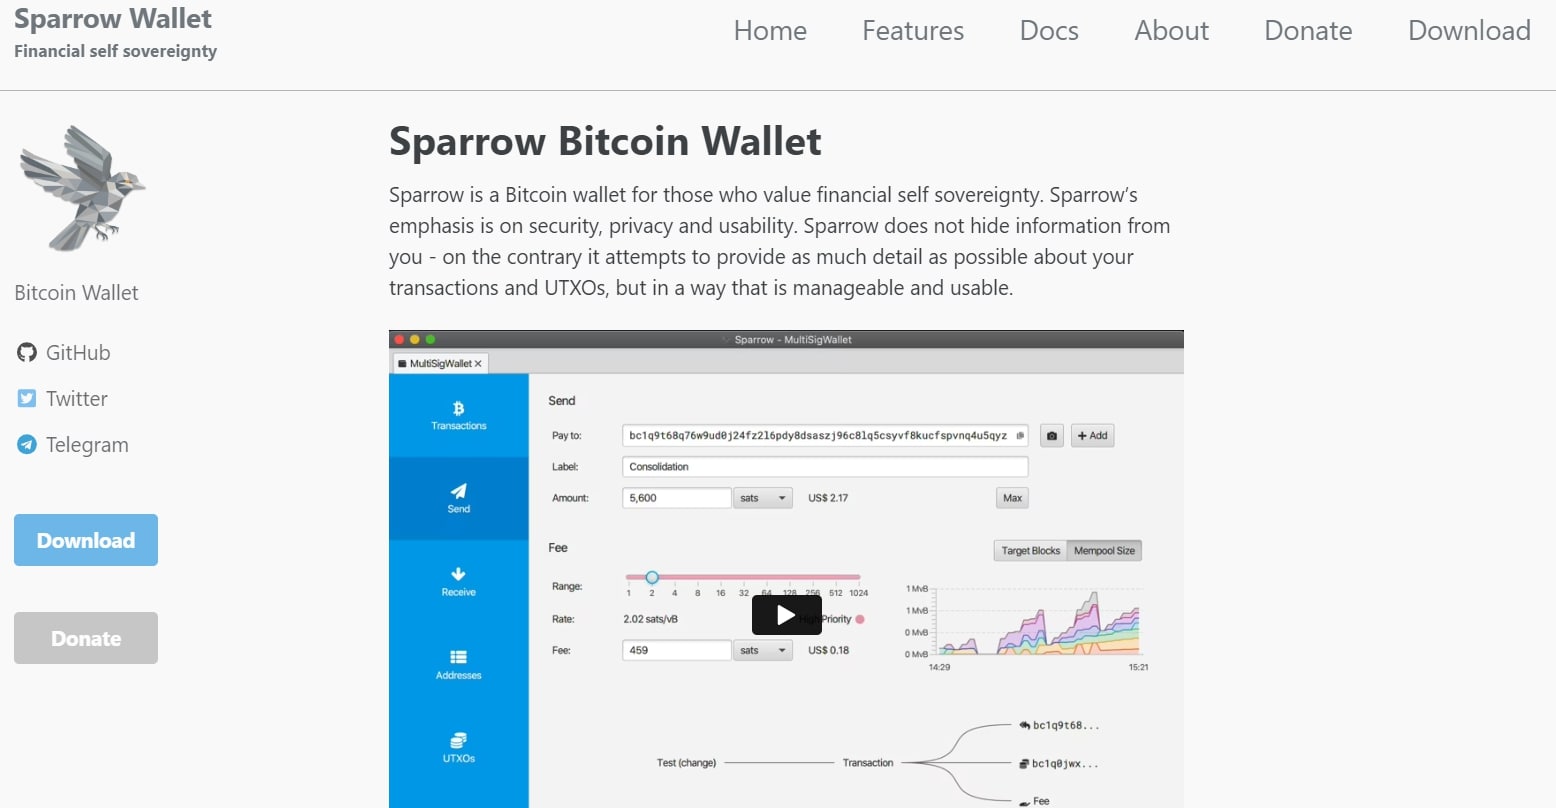
Click "Download" and install the version compatible with your operating system.
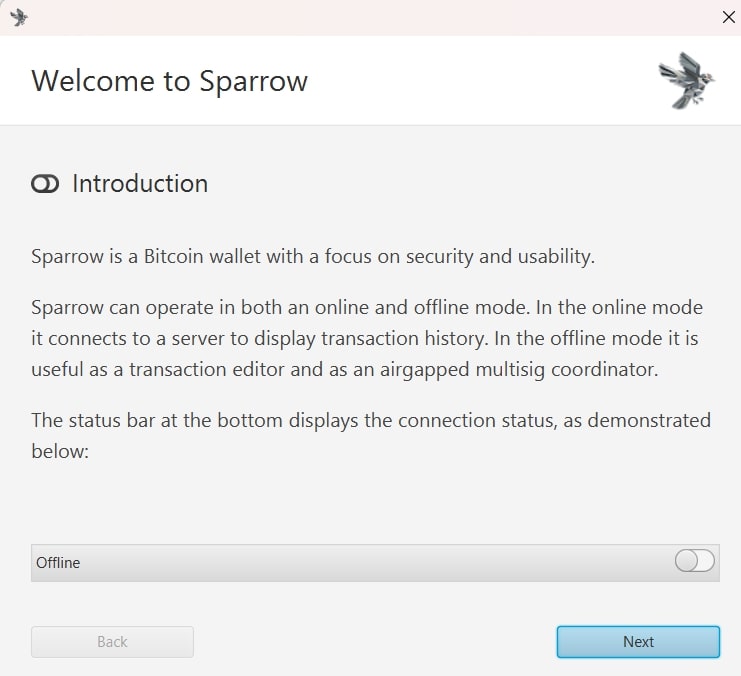
After reading the text, click "Next" to proceed.

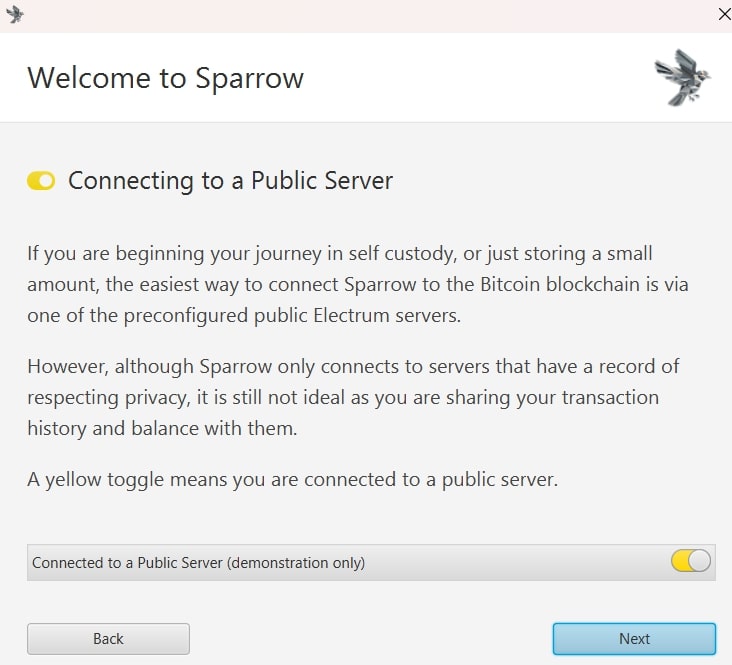
The next few screens will explain the methods to connect to the Bitcoin network. Sparrow Wallet offers the following three options:
- Public Server: Servers publicly available by companies or organizations
- Bitcoin Core: A Bitcoin Core node operated by yourself
- Private Electrum: An Electrum server operated by yourself

Servers? Beginners don't often hear the word "server" when talking about Bitcoin transactions.
Bitcoin operates on a decentralized network, but transaction data is distributed and stored across nodes (servers) within the network.
Bitcoin wallets like Sparrow need to fetch the latest blockchain information from these nodes to send and receive transactions and check balances.


I see. So, what does it mean to choose a server?
If you operate your own node, you can manage transaction information without relying on third parties, enhancing privacy and security.


Operating a node sounds difficult! What should someone who has never done it do?
Beginners should proceed with the default Public Server setting.
As you deepen your understanding of Bitcoin, you might try different settings when you're ready to run your own node.

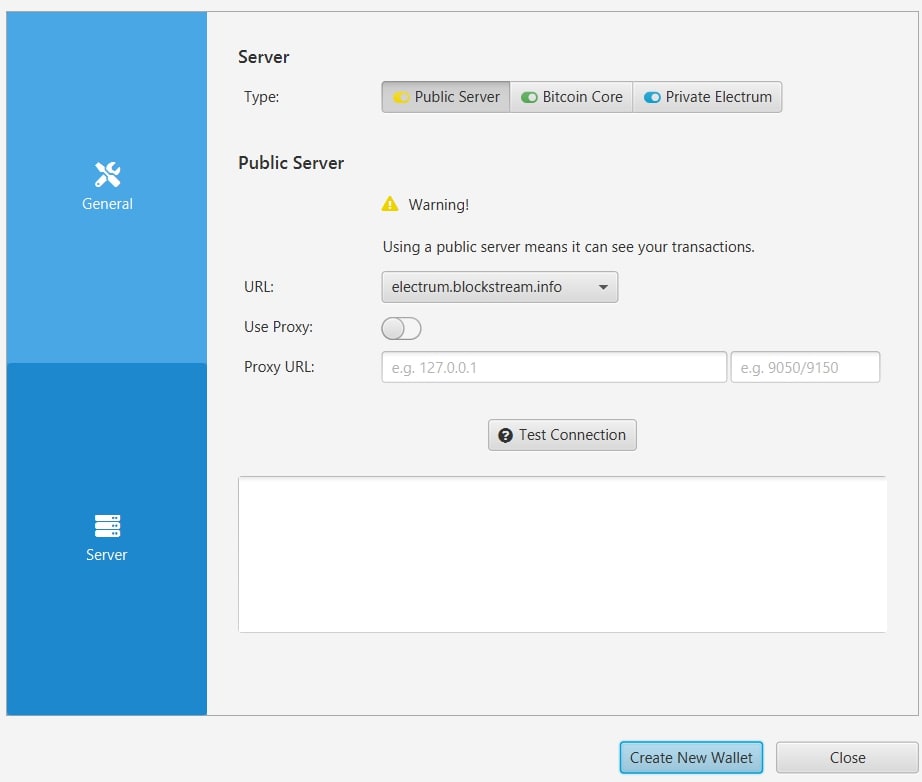
After choosing a server, select a preferred public server URL and click "Create New Wallet."
Note: URL refers to the node (server) address needed to connect to the Bitcoin network. There are many, including blockstream.info provided by Blockstream and electrum.blockstream.info, a public node compatible with the Electrum protocol.
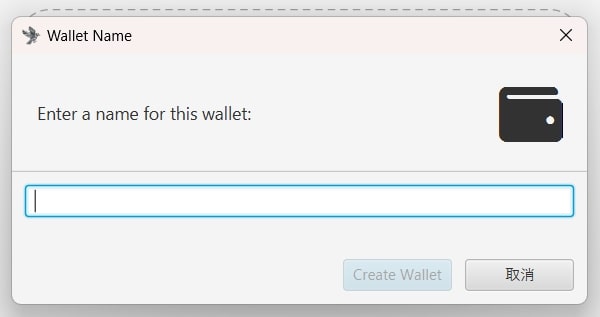
On the Wallet name screen, just name it something that's easy for you to recognize.

Linking COLDCARD with Sparrow Wallet
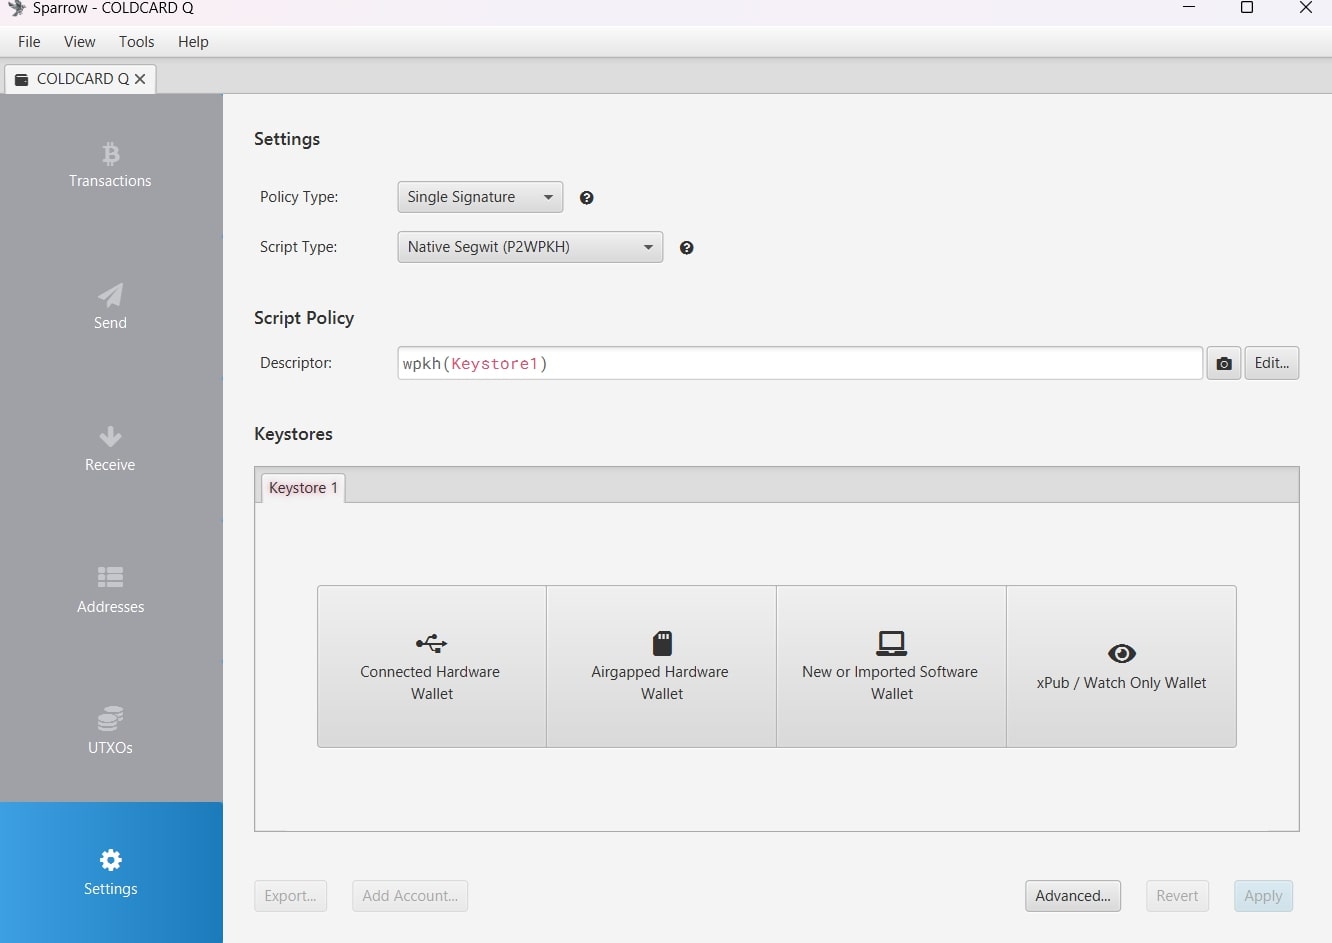
To import Coldcard information into Sparrow Wallet, you can choose from multiple methods such as connecting the device to the PC or using a microSD card.
This time, I tried using the Coldcard QR code method.

Note that Coldcard Q is not configured to connect to a PC via USB by default. If you want to use USB, navigate to "Settings" → "Hardware On/Off" → "USB Port" → "Default On".
Using Coldcard QR Code
- In the Keystores section, select Airgapped Hardware Wallet.
Click "Scan" in the Coldcard section (this will activate the PC camera). - On the device:
Navigate to Advanced/Tools → Export Wallet → Descriptor.
Device Display Content
This saves a ranged xpub descriptor
Press (1) to enter a non-zero account number.
The file created is sensitive--in terms of privacy--but should not compromise your funds directly.

XPUB? Descriptor?
XPUB (Extended Public Key) is a key used in Bitcoin wallets to generate new Bitcoin addresses. Unlike a regular public key that generates a single Bitcoin address, an XPUB can manage many Bitcoin addresses at once.


Generating a new Bitcoin address for each transaction can enhance privacy.
A descriptor defines how the wallet generates Bitcoin addresses. It tells the wallet to use the XPUB to create, for example, Segwit-format Bitcoin addresses. Using descriptors allows different wallets to share the same configuration, enhancing compatibility.


That makes it easier to manage. I want to know if there are any risks involved.
XPUB is not a private key, but if it leaks, third parties can monitor your Bitcoin addresses and balances, so keep it private. Also, if the descriptor is set incorrectly, the wallet may generate wrong addresses, making it difficult to access your funds. Ensure the descriptor is accurate and test with small transactions.

Device Display Content
To export receiving and change descriptors in one descriptor (<0;1> notation) press ENTER, press (1) to export receiving and change descriptors separately.
→ Press ENTER
→ Choose Segwit P2WPKH (make sure Sparrow Wallet's Script Type is set to "Native Segwit (P2WPKH)").
Receiving Descriptor: Provides information for generating addresses to receive Bitcoin.
Change Descriptor: Provides information for generating addresses for change (unused Bitcoin) after sending.
Address format options:
Segwit P2WPKH: Addresses starting with bc1, efficient with low fees.
Classic P2PKH: Addresses starting with 1, the oldest format.
P2SH-Segwit: Addresses starting with 3, compatible with older wallets but with some Segwit benefits.
Device Display Content
Press (1) to save Descriptor file to SD Card, (B) for lower slot, (OR) to show QR code.
→ Press QR
→ Scan the displayed QR code with the PC camera on the Sparrow Wallet screen in the xpub: field.
→ Confirm if it matches the Master fingerprint, then click Apply.
Display Content
Add a password to the wallet?
Leave empty for no password:
This is asking if you want to set a password for viewing the wallet on the PC, which is unrelated to the Coldcard's seed phrase.


Now Sparrow Wallet and Coldcard can be linked! There are many difficult terms, so beginners should proceed carefully.
Receiving Bitcoin with COLDCARD Q
Coldcard can display the Bitcoin receiving address as a QR code on its screen, making the receiving process relatively straightforward. Use the "Address Explorer" menu to display the QR code.
Device Display Content
Address Explorer
The following menu lists the first payment address produced by various common wallet systems.
Choose the address that your desktop or mobile wallet has shown you as the first receive address.
WARNING: Please understand that exceeding the gap limit of your wallet, or choosing the wrong address on the next screen may make it very difficult to recover your funds.
Press(4) to start or (6) to hide this message forever.
→ Press (4)
→ Select "Segwit P2WPKH"
Device Display Content
Addresses 0…9:
Nine addresses are displayed: m/84h/0h/0h/0/0(~9)
At the bottom of the screen:
Press (1) to save address
summary file to SD Card, (B) for lower slot, (QR) to show QR code, (0) to show change addresses.
LEFT to go back. CANCEL to quit.
m/84h/0h/0h/0/0 is the "BIP32 path" used to generate addresses.
【BIP32 Path Structure】
m: Indicates the master key, meaning this path starts from the master key.
84h: Indicates the account type, generating native SegWit (P2WPKH) addresses based on BIP84.
0h: Bitcoin coin type.
0h: Default account number.
0: Chain index for receiving addresses. Change addresses (for transaction change) use 1.
0: First receiving address.
Press the QR button to display the top address as a QR code. After confirming the address, use it as your receiving address.
You can check if the Bitcoin has been received through the "Transaction" section of Sparrow Wallet.
Bitcoin wallets automatically generate new addresses each time you receive Bitcoin to enhance privacy and security. After receiving Bitcoin once, the next time you receive Bitcoin, the address m/84h/0h/0h/0/1 will be displayed at the top.


Once an address is used, is it no longer usable?
The same address can be used multiple times. However, for privacy reasons, it's generally recommended to use a different address.

Sending Bitcoin with COLDCARD Q
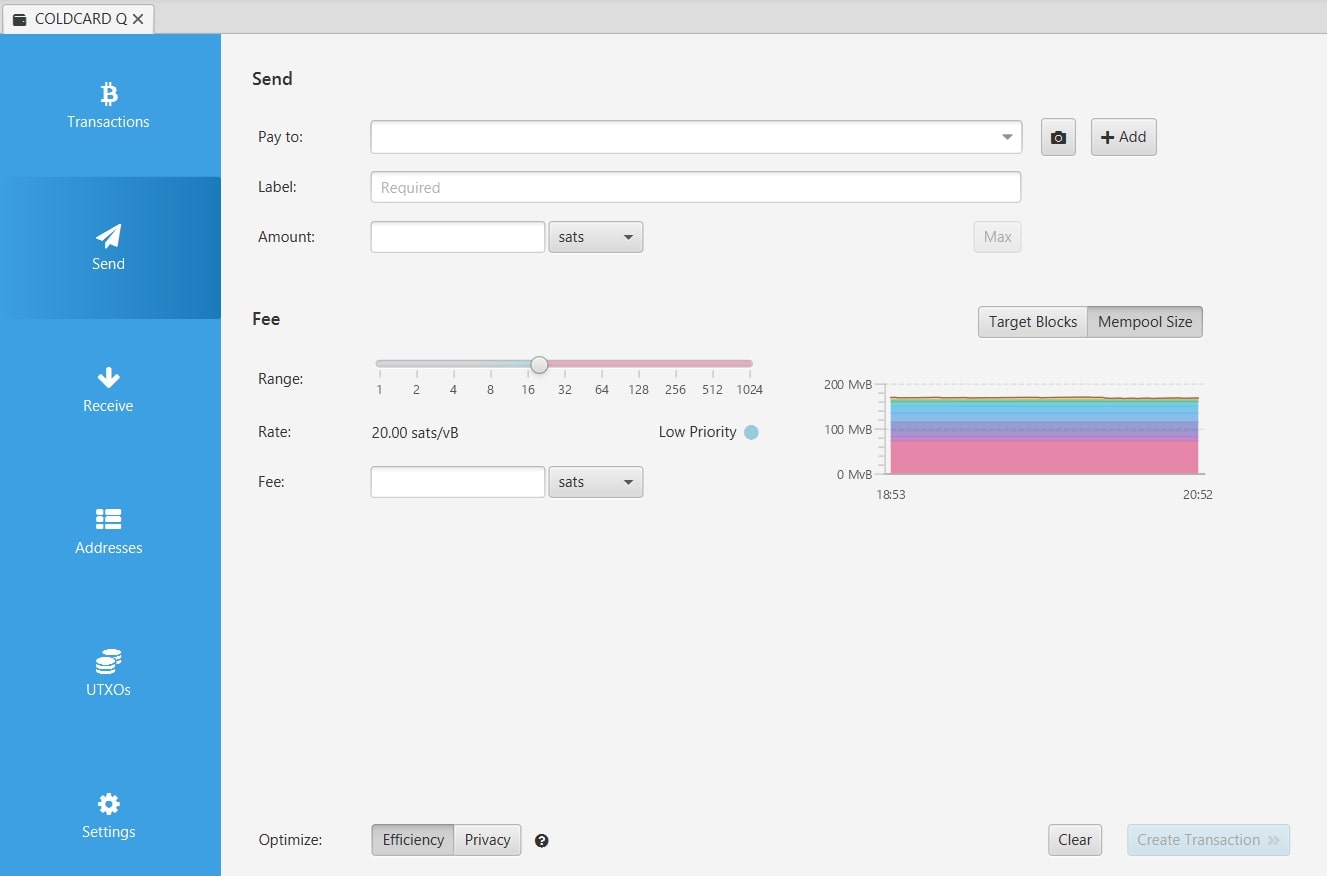
When sending Bitcoin, you will need to use Sparrow Wallet for the operation.
Steps in Sparrow Wallet
- Select "Send"
- Enter the recipient's address in "Pay to"
- Enter a label name for record-keeping in "Label"
- Enter the amount to send in "Amount"
- Review and set the fee in the "Fee" section
- After verifying all details, click "Create Transaction"
After checking the transaction confirmation screen, click "Finalize Transaction for Signing." There are several methods for signing, such as saving to an SD card or connecting the device.
This time, I'll introduce how to use a QR code.

Select "Show QR" under Signatures to display the QR code. On this screen, click "Show BBQr."
BBQr stands for BIP21 QR code, which is the standard format for Bitcoin payment addresses.
Next, operate the Coldcard Q device. When you select "Ready To Sign," the following will be displayed:
Device Display Content
Coldcard is ready to sign spending transactions!
Put the proposed transaction onto MicroSD card in PSBT format (Partially Signed Bitcoin Transaction) or upload a transaction to be signed from your desktop wallet software or command line tools.
Press(b) to import PSBT from lower slot SD Card, (QR) to scan QR code.
You will always be prompted to confirm the details before any signature is performed.
→ Press the QR button
Coldcard Q has a QR code scanner on the top. By slowly moving the device up and down in front of the PC screen, the QR code was successfully read.

Device Display Content
OK TO SEND?
*Review the amount to send, fee, change back, and TX LOCKTIMES displayed.
Press ENTER to approve and sign transaction. CANCEL to abort.
Pressing ENTER will display a QR code on the Coldcard Q screen. Then, click "Scan QR" on Sparrow Wallet to read the QR code from the device.

By the way, the author found that if the PC had trouble reading the QR code, taking a screenshot with a smartphone and enlarging it made it easier for the PC to read.
Finally, click "Broadcast Transaction" to send the transaction to the entire network. The transaction will be recognized and verified by other nodes, and eventually recorded on the blockchain.

Q&A about COLDCARD

I want to know more about COLDCARD.
I'll answer some questions about COLDCARD in a Q&A format.

What should I be careful about with COLDCARD's PIN code?
COLDCARD's PIN code is designed to be stricter compared to Trezor or Ledger. If you fail to log in with the PIN code 13 times, COLDCARD will stop functioning and cannot be reset or recovered. Unlike other hardware wallets, you cannot "reset the PIN + enter the seed phrase to restore." Treat COLDCARD's PIN code with the same care as your seed phrase.
If you fail the PIN code input more than three times, a warning will appear that the device might get damaged. After that, the wait time increases each time you try, making it impossible to input without waiting for hours.


If I input the correct PIN code, the 13-time limit resets, right? I’ll try to enter it without rushing too much.
How can I check COLDCARD's seed phrase?
On COLDCARD Q, the seed phrase can be displayed by navigating to "Advanced/Tools" → "Danger Zone" → "Seed Functions" → "View Seed Words." Many of the menus within the Danger Zone are developer functions and can affect your Bitcoin holdings, so use them cautiously.
Device Display Content
Are you sure?!?
The next screen will show the seed words (and if defined, your BIP-39 passphrase).
Anyone with knowledge of those words can control all funds in this wallet.

A warning is displayed, so relying on this feature might not be a good idea.
If you absolutely need to display the seed phrase, do so in a secure environment where no one else can see it.

What should I be aware of when storing the seed phrase?
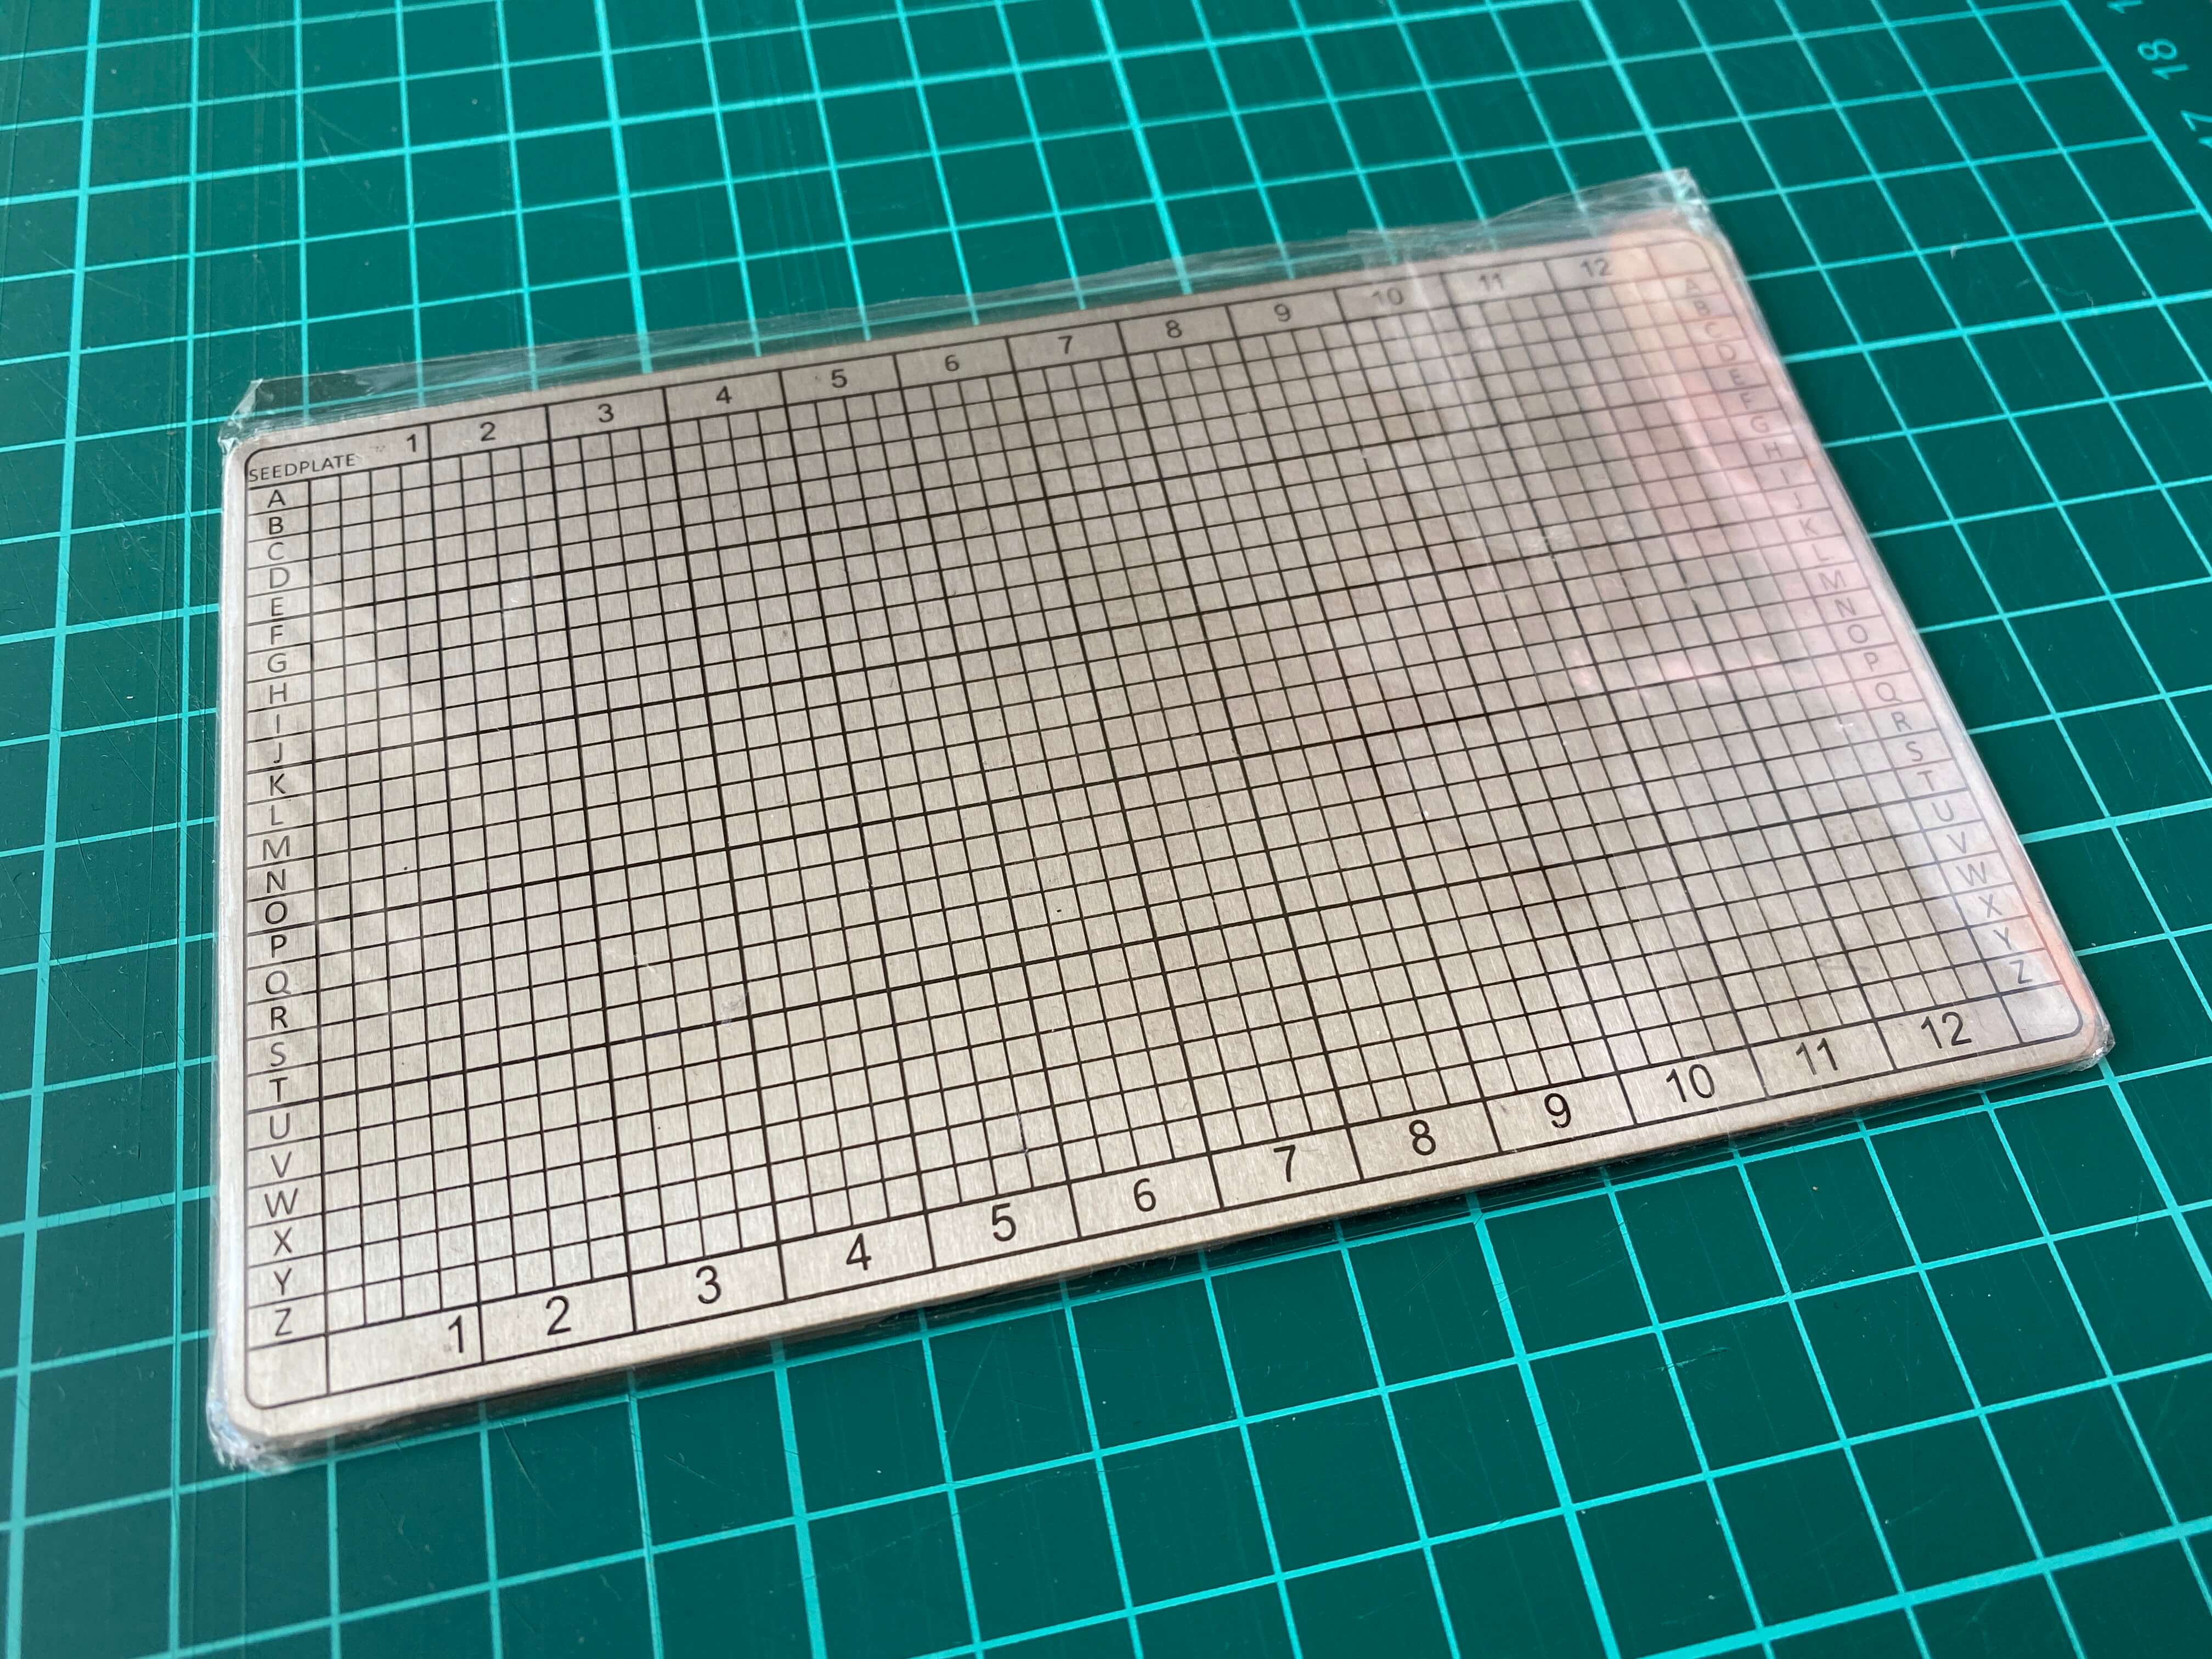
Losing the recovery seed means losing your Bitcoin, so you need to store it securely. Avoid storing it on devices that can be accessed via the internet, such as smartphones or computers. To thoroughly enhance safety, using metal plates with high durability, heat resistance, and corrosion resistance for storage is recommended.

Metal plates for protecting the recovery seed can cost around several thousand yen to ten thousand yen, but considering potential emergencies, it's an important tool. The COLDCARD seller, Coinkite, offers the "SEEDPLATE" for $49.97.
I'll cover more about seed phrase storage methods in a separate article next time.

Recommended Articles:How to Store Recovery Phrases
[Summary] Manage your Bitcoin with COLDCARD!
Key Points
- COLDCARD is a hardware wallet specialized for Bitcoin.
- It has numerous advanced security features and can be operated without connecting to a computer.
- Manage the device, seed phrase, passphrase, and PIN code carefully to prevent them from being known or stolen by others.

With COLDCARD, you can self-custody your Bitcoin!
Self-custody might seem daunting, but it's actually not that hard once you try it. Managing your Bitcoin yourself deepens your understanding of Bitcoin, so give it a try!


Bitcoin seems complicated, but now I want to know more about it. Let's learn more about Bitcoin!
Recommended Articles:What is Bitcoin?

Writer:Sigeru Minami
Creator of "Bitcoin-zukan.com."
Active as a handmade craftsman of Bitcoin goods.
